Chocolate Peanut Butter Balls deliver creamy peanut centers in a snappy chocolate shell—four ingredients, no bake, and endlessly giftable for holidays, parties, or late-night cravings.
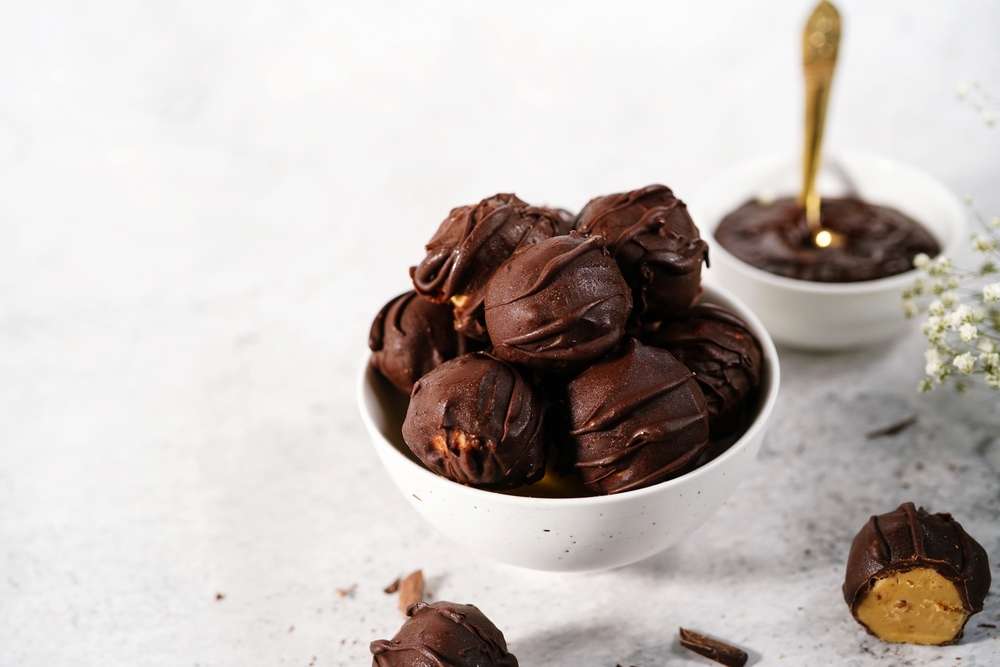
This is the kind of candy that makes you look like a chocolatier with almost no effort. A simple peanut butter dough mixes up in minutes, chills briefly, and rolls into tidy bites that dip beautifully. The chocolate sets with an irresistible sheen, and each piece snaps before giving way to a soft, salty-sweet middle.
Because the ingredient list is short, every choice matters. A smooth, shelf-stable peanut butter keeps the centers plush and uniform. Powdered sugar brings structure without graininess. A little butter adds body and richness, while semisweet chips melt into a glossy coating that balances sweetness perfectly. If you want an even silkier dip, a spoonful of shortening or coconut oil loosens the chocolate for that classic, shiny finish.
Chocolate Peanut Butter Balls Ingredients
- Creamy peanut butter — The base of the filling; choose a smooth, shelf-stable style so the balls hold shape and slice cleanly without oily separation.
- Salted butter — Softened and mixed in for richness and a truffle-like texture that stays tender after chilling.
- Powdered sugar — Sweetens and firms the peanut butter mixture without grit; it also helps the centers keep a neat round shape.
- Semisweet chocolate chips — Melt into a balanced, not-too-sweet shell that sets with a satisfying snap.
- Vegetable shortening or refined coconut oil (optional) — A small spoonful yields a thinner, glossier coating that’s easier to dip and less prone to streaking.
Step-by-Step Chocolate Peanut Butter Balls
- Stir the peanut butter and softened butter together in a mixing bowl until completely smooth and cohesive; you want a glossy, unified paste with no streaks of butter remaining.
- Sprinkle in powdered sugar gradually, folding until the mixture turns from soft and sticky to supple and rollable; it should feel like playdough—firm enough to shape, not crumbly.
- Cover the bowl and chill about 15 minutes so the mixture firms slightly; this quick rest makes rolling clean, round balls effortless and keeps fingerprints off the surface.
- Scoop one-inch portions and roll between your palms until smooth. Set the balls on a parchment-lined sheet, cover, and refrigerate at least 20 minutes so they stay perfectly round during dipping.
- Melt the chocolate chips gently (microwave in short bursts or over a double boiler) until smooth. If using, stir in a spoonful of shortening or coconut oil to loosen and add gloss.
- Dip each peanut butter ball with a fork, letting excess chocolate drip back into the bowl, then slide onto fresh parchment. Chill until the shells are set and matte. Serve once firm or store for later.
Can I use natural peanut butter?
You can, but results vary. Natural peanut butter that separates in the jar tends to make oily, softer centers. If you use it, stir extremely well and add a bit more powdered sugar to reach a firm, rollable texture.
How do I avoid chocolate cracking or bloom?
Dip well-chilled, not frozen centers, and let the coating set in a cool room or the fridge—not the freezer. Gentle melting and avoiding moisture (no steam or water drips) prevent streaks, sugar bloom, and that dusty finish.
Can I dip without shortening or coconut oil?
Yes. Pure melted chips coat beautifully, just a little thicker. If the chocolate seems too dense, add ½–1 teaspoon oil at a time until it flows smoothly off the fork and leaves a thin, even shell.
Helpful Tips
- Roll with cool hands. If the mixture softens, pop the tray back in the fridge for a few minutes; firm centers dip cleaner and keep a perfectly round shape.
- Decorate as you go. Add a peanut butter drizzle, flaky sea salt, crushed peanuts, or festive sprinkles while the chocolate is still wet so toppings adhere without smudging.
- Reserve a bit of the filling. If any balls crack during dipping, patch with a pea of filling and redip; the second coat hides imperfections and still sets neatly.

What to Serve with Chocolate Peanut Butter Balls
A small plate of salty snacks—pretzels or roasted peanuts—balances the sweetness and adds crunch. For a dessert board, pair with fresh berries for brightness and a few dark chocolate squares for a deeper cocoa contrast. Coffee or cold milk is the classic, unbeatable partner.
Storage & Make-Ahead
These candies are built for gifting and make-ahead ease. Once the coating sets, transfer the balls to an airtight container, layering with parchment so they don’t scuff. They keep at cool room temperature for 4–5 days or in the refrigerator up to 2 weeks with a slightly firmer bite. For longer storage, freeze up to 2 months: set the dipped candies on a tray to freeze solid, then bag or box tightly with parchment between layers. Thaw in the refrigerator to prevent condensation from clouding the chocolate, then bring to room temp for the best texture.
If you’re packing for travel or cookie trays, chill the finished candies first so the shells are fully set and resilient. Stack gently with parchment, and avoid warm car rides or sunny windows—semisweet chocolate softens quickly above room temperature. For glossy finishes that last, keep them around 60–68°F whenever possible.
Pro Tips for a Flawless Finish
A gentle melt is everything. Microwave the chocolate at 50% power in 20–30-second bursts, stirring between each, and stop when just a few soft chips remain; the residual heat finishes the job. If you use a double boiler, keep the water at a bare simmer and the bowl dry; a single drop of water can seize the chocolate and turn it grainy. When dipping, tap the fork on the bowl’s edge to knock off excess so the shell doesn’t pool under the candy, then slide the base off the fork tines with a toothpick for a clean underside.
Finally, embrace uniformity for that boutique look. Use a small cookie scoop so each center is the same size, line them up like tiny truffles, and finish with a deliberate garnish—one peanut half, a light salt pinch, or a contrasting drizzle. The simplicity of this four-ingredient candy is part of its charm, and a few precise touches make it look as polished as it tastes.
Chocolate Peanut Butter Balls
Ingredients
- 1 cup powdered confectioners’ sugar
- 3 tablespoons butter with salt softened to room temperature
- 1 tablespoon coconut oil or neutral shortening optional
- 1 cup semi-sweet chocolate morsels
- 1/2 cup smooth-style peanut butter
Instructions
- In a medium bowl, thoroughly blend the softened salted butter with the creamy peanut butter until smooth and cohesive.
- Gradually incorporate the powdered sugar into the mixture, stirring until a firm dough forms. Once combined, cover and refrigerate for approximately 15 minutes to allow the mixture to solidify slightly.
- After chilling, scoop and shape the mixture into spheres roughly one inch in diameter using your hands. Arrange them evenly on a lined baking sheet. Cover and chill the tray in the refrigerator for no less than 20 minutes to ensure the balls maintain their structure during coating.
- Melt the chocolate chips (and optional shortening or coconut oil for smoother texture) by following the instructions provided on the chocolate packaging.
- Using a fork, immerse each chilled peanut butter ball into the melted chocolate, letting any excess drip off before transferring them to a wax paper-lined surface.
- Once all balls are coated, refrigerate them until the chocolate is firm and the candies are ready for serving.