
Cottage cheese sourdough bread is a tender, naturally leavened loaf with a golden crust, a soft sliceable crumb, and a mild tang from active sourdough starter. Blended cottage cheese and egg whites keep the dough moist, while slow proofing develops structure and flavor with very little hands-on work.
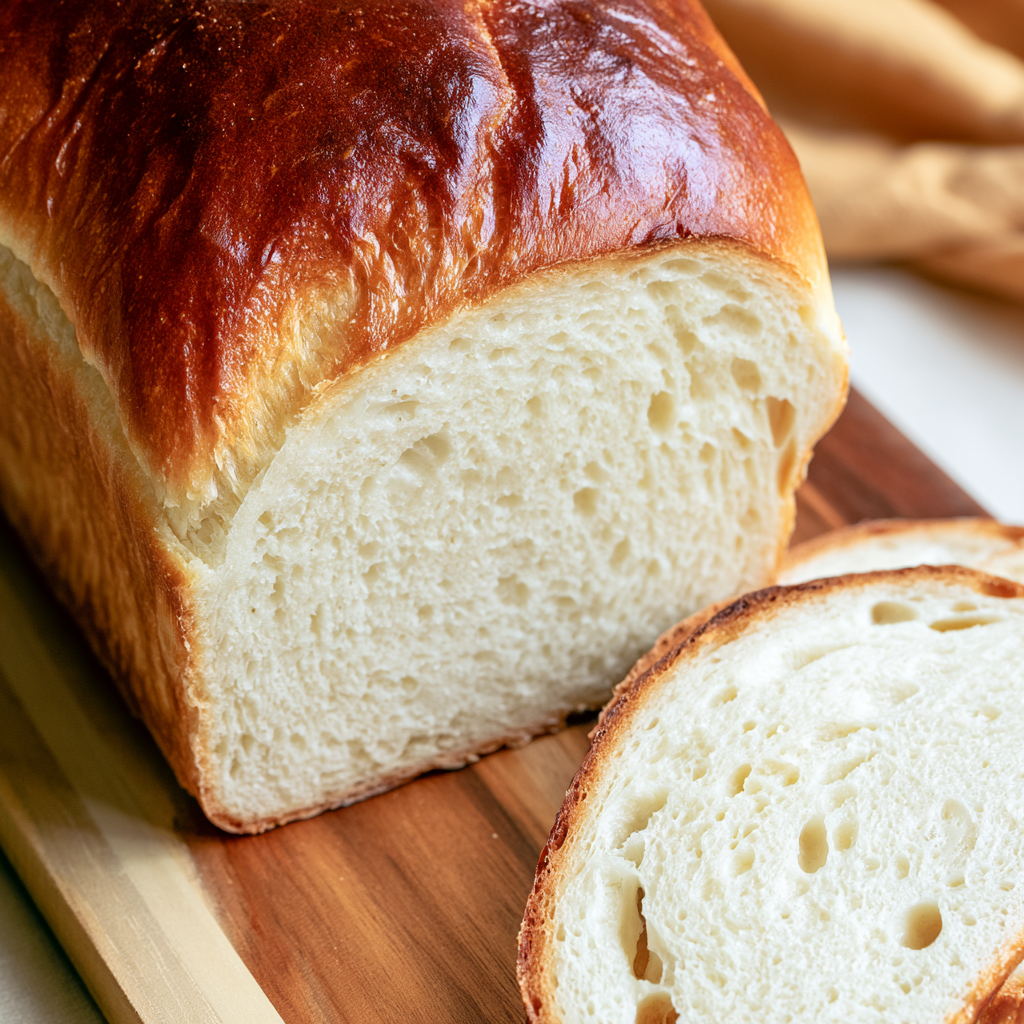
This is a useful loaf to start in the evening when you want fresh bread the following day. Although the overall fermentation is long, most of that time is completely hands-off, and the dough is prepared with a simple sequence of short kneading and folding sessions.
The cottage cheese disappears into the dough after blending, so you do not end up with noticeable curds in the finished loaf. Combined with egg whites and a little neutral oil, it produces a tender interior that works especially well for toast and sandwiches.
The biggest key is letting the dough tell you when it is ready rather than following the clock too closely. Starter strength and room temperature can change the proofing time considerably, so look for a loaf that has filled the pan and reached the rim before baking.
Cottage Cheese Sourdough Bread Ingredients
Cottage cheese gives the loaf moisture and tenderness. Blending it before mixing creates a smooth dough without visible curds.
Egg whites are blended with the cottage cheese and contribute additional liquid while helping create the distinctive crumb.
Active sourdough starter provides the natural leavening. Use a starter that has recently been fed and is visibly bubbly for a more dependable rise.
Bread flour supplies enough gluten-forming strength to support the enriched, moist dough during its long fermentation.
Neutral oil keeps the crumb tender without introducing a strong flavor. Canola, grapeseed, or another mild oil works well.
Salt balances the flavor and helps strengthen the dough as it ferments.
Egg is used as a wash just before baking to encourage an evenly browned, attractive top crust.
Hot water goes into a separate oven-safe pan to create steam during the first part of baking.

Cooking Steps
STEP 1: Blend the cottage cheese and egg whites until completely smooth. Pour the mixture into a large bowl, then stir in the active sourdough starter and neutral oil until the wet ingredients are evenly combined.
STEP 2: Add the bread flour and salt. Mix until there are no large pockets of dry flour and a rough, shaggy dough has formed. Cover the bowl and leave the dough to rest for 30 minutes so the flour has time to hydrate.
STEP 3: Knead the rested dough for about 2–3 minutes using a gentle pulling and slapping motion. Cover it and rest for another 30 minutes. Repeat the short kneading session once more, then give the dough another 30-minute rest.
STEP 4: Begin the stretch-and-fold stage. Pull up one side of the dough without tearing it and fold it over the center. Turn the bowl and continue until you have completed roughly 6–8 folds. Rest for 30 minutes, then repeat with about 4–6 folds. If the dough still feels loose, you can complete one final set of four folds after another short rest.
STEP 5: Lightly flour your work surface and turn out the dough. Pat it gently into a rectangle without forcing out all of the fermentation bubbles. Fold both sides toward the center, roll the dough into a compact log, and pinch the seam closed.
STEP 6: Place the shaped loaf seam-side down in a greased 9 × 5-inch loaf pan. Lightly oil the exposed surface and cover it. Leave it to proof for approximately 8–12 hours, or until it has expanded to the rim of the pan or slightly above it.
STEP 7: Preheat the oven to 350°F (175°C). Brush the top of the proofed loaf with beaten egg. Place an oven-safe pan in the oven near the bread and carefully add boiling water for steam. Bake for 45–50 minutes, or until deeply browned and about 190°F (88°C) in the center.
STEP 8: Let the loaf rest in the pan for 5–10 minutes before transferring it to a wire rack. Give it at least 30 minutes to cool before slicing so the warm interior has time to finish setting.
Recipe Tips
- Watch the dough instead of relying only on time. A warm kitchen and vigorous starter may shorten an overnight proof, while a cooler room can make it considerably longer.
- Do not skip blending the cottage cheese. A smooth mixture incorporates more evenly into the flour and gives the baked loaf a more uniform crumb.
- Wait before slicing. Cutting sourdough while it is very hot can compress the interior and make an otherwise properly baked loaf seem gummy.
Can I proof the dough overnight?
Yes. The long final proof makes this bread particularly convenient for an overnight schedule. Shape the dough, place it in the prepared loaf pan, cover it, and let it ferment until it reaches approximately the top of the pan.
Because room temperatures vary, check the loaf rather than assuming it will always need exactly eight or twelve hours. If your kitchen is especially warm, it may rise faster.
Why did my sourdough loaf not rise enough?
The most common reason is an inactive starter or insufficient proofing time. Your starter should be noticeably bubbly and active before it goes into the dough.
Temperature also matters. In a cool kitchen, this enriched dough can take longer to rise. Instead of baking simply because the suggested time has passed, wait until the dough has visibly expanded and reached the rim of the loaf pan.
Do I need the third stretch and fold?
No. The third set is optional. After two rounds, the dough may already feel smoother, more elastic, and capable of holding its shape.
If it still spreads easily or lacks tension, another short folding session can help strengthen it. If it already feels well developed, you can move on to shaping.
How do I know when the bread is fully baked?
The exterior should be well browned and the loaf should feel set rather than soft and doughy. For a more reliable test, check the center with an instant-read thermometer. An internal temperature around 190°F (88°C) indicates that the loaf is ready to come out of the oven.

Can I make this bread without the steam pan?
You can, but the added steam helps create a better baking environment as the loaf begins to expand in the oven. You only need a small oven-safe pan and hot water.
Pour the water carefully to avoid splashing yourself or the hot oven surfaces, and never use a container that is not rated for oven temperatures.
What to Serve with Cottage Cheese Sourdough Bread
Soup: Thick slices are excellent alongside tomato soup, vegetable soup, or a hearty chicken soup. Toasting the bread first gives it a firmer surface for dipping.
Eggs: Serve a warm or toasted slice with scrambled, fried, or poached eggs for a simple breakfast or brunch.
Sandwich fillings: The soft but structured crumb makes this loaf useful for everyday sandwiches. Once completely cooled, slice it evenly and use it anywhere you would normally use sandwich bread.
Keeping Leftovers Fresh
Let the loaf cool completely before storing it. Trapping residual heat inside a bag or container can create condensation and soften the crust.
For the freshest texture, keep the bread in a well-sealed bread bag or airtight container at room temperature for about 2 days. If you need to keep it longer, refrigerate it for up to 4–5 days. Refrigeration can make bread feel firmer, so toasting or reheating refrigerated slices usually improves their texture.
For longer storage, slice the fully cooled loaf before freezing. Place parchment between slices if you want to remove them individually, then seal everything in a freezer-safe bag or container. Freeze for up to about 2 months for the best quality.
Individual frozen slices can go directly into a toaster. To warm several slices at once, place them in a low oven until heated through. A whole or partial loaf can also be allowed to thaw at room temperature before being gently warmed.
This loaf rewards patience more than complicated technique. Keep your starter active, give the dough enough time to rise, and use the height of the loaf in the pan as your main guide. Once baked and properly cooled, you will have a tender homemade sourdough loaf that slices cleanly and works just as comfortably at breakfast as it does for sandwiches later in the day.
Cottage Cheese Sourdough Bread
Ingredients
- 3/4 cup cottage cheese
- 2 1/4 cups bread flour
- 1 large egg for the egg wash
- 1 1/2 teaspoons salt
- 3/4 cup egg whites
- Hot water as needed to create steam during baking
- 3 tablespoons neutral-flavored oil such as canola or grapeseed oil
- 1/4 cup active bubbly sourdough starter
Instructions
- Blend the cottage cheese mixture. Place 185 grams of cottage cheese and 185 grams of egg whites in a small blender. Process until completely smooth and uniform.
- Combine the wet ingredients. Transfer the blended cottage cheese mixture to a mixing bowl. Add 150 grams of active sourdough starter and 30 grams of neutral oil, then mix thoroughly until evenly incorporated.
- Form the dough. Add 325 grams of bread flour and 10 grams of salt. Stir until the ingredients come together into a rough, shaggy dough. Cover the bowl and allow the dough to rest for 30 minutes.
- Begin kneading. After the first rest, knead the dough for 2–3 minutes using a pulling and slapping technique. Cover the bowl again and leave the dough undisturbed for another 30 minutes.
- Repeat the kneading stage. Knead for an additional 2–3 minutes in the same manner. Cover and rest for another 30 minutes.
- Complete the first stretch and fold. Lift and stretch the dough before folding it back over itself, working from each cardinal direction. Complete approximately 6–8 folds in total. Cover and rest for 30 minutes.
- Perform the second stretch and fold. Repeat the folding process, this time completing 4–6 folds. Cover the dough and allow it to rest for another 30 minutes.
- Add an optional third fold. If desired, perform one additional stretch-and-fold session using 4 folds. Cover and rest the dough for another 30 minutes.
- Shape the loaf. Lightly dust a work surface with flour and turn the dough onto it. Gently pat it into a rectangular shape.
- Form a log. Fold the left and right sides toward the center, then roll the dough into a log. Pinch the seams firmly closed.
- Transfer to the loaf pan. Place the shaped dough seam-side down in a greased 9 × 5-inch loaf pan. Lightly coat the surface with oil to help prevent the covering from sticking.
- Proof the dough. Cover the loaf and leave it to ferment until the dough fills the pan and reaches the rim or rises slightly above it. This stage generally requires approximately 8–12 hours.
- Prepare for baking. Preheat the oven to 350°F (175°C). At the same time, bring water to a boil in a kettle or saucepan.
- Apply the egg wash. Uncover the proofed loaf and brush its surface with an egg wash prepared from one whole egg or one egg yolk.
- Create steam and bake. Position an oven-safe pan beside the loaf and carefully pour the boiling water into it. Bake the bread for 45–50 minutes, or until the center of the loaf reaches an internal temperature of 190°F (88°C).
- Cool the loaf. Leave the baked bread in its pan for 5–10 minutes. Remove it from the pan and transfer it to a wire cooling rack.
- Allow the crumb to set. Cool for at least 30 minutes before slicing.