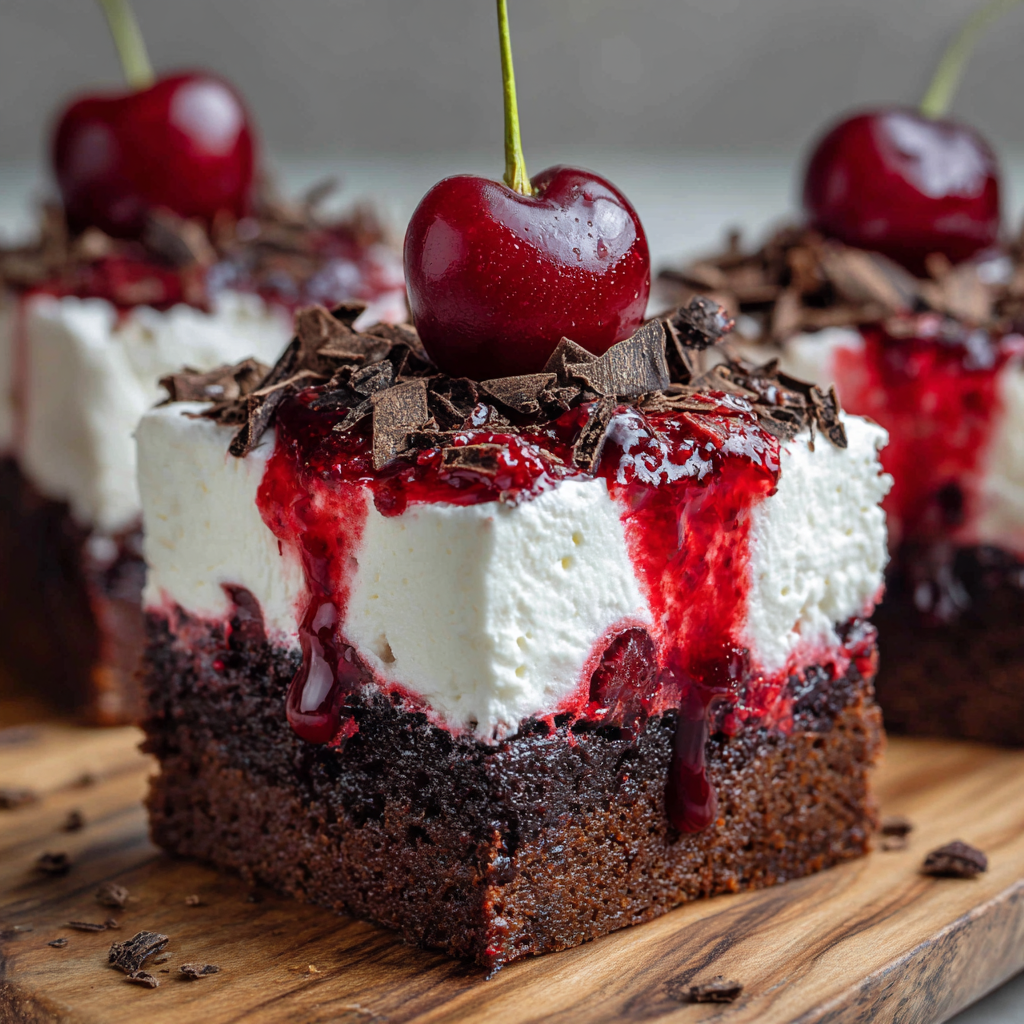
Black Forest Brownies
A luscious fusion of rich, dense chocolate brownies layered with airy whipped cream and a glossy cherry compote, these Black Forest Brownies capture the essence of the classic cake in every decadent bite. With a harmonious balance of textures and flavors, this indulgent treat is perfect for special occasions or any time you're craving something extraordinary.
Pin it to remember it!
Print Recipe
Servings: 16
Ingredients
For the Cherry Layer
- 30 grams of room temperature water
- 2 tablespoons of cornstarch approximately 8 grams
- 2 tablespoons 30 grams of Kirsch liqueur, optional for added depth
- 250 grams of cherries fresh or frozen and pitted (about 1½ cups)
- 100 grams of white granulated sugar roughly ½ cup
For the Chocolate Brownies
- 150 grams of tightly packed light brown sugar ¾ cup
- ¾ teaspoon baking powder
- 170 grams of melted unsalted butter slightly cooled (¾ cup)
- 1 teaspoon of fine-grain salt 6 grams
- 8 grams of pure vanilla extract or vanilla bean paste 2 teaspoons
- 3 large eggs at room temperature (about 170 grams total)
- 50 grams of Dutch-process or dark cocoa powder ½ cup
- 94 grams of all-purpose flour ¾ cup
- 180 grams of dark chocolate chips or chunks optional (1 cup)
- 150 grams of white granulated sugar ¾ cup
For the Stabilized Whipped Cream
- 113 grams of full-fat cream cheese cold (½ cup or 4 oz)
- 4 grams of vanilla extract or paste 1 teaspoon
- 65 grams of powdered sugar ½ cup
- 300 grams of heavy cream well chilled (1¼ cups)
Equipment Needed
- 8 x 8-inch metal baking pan
- Medium saucepan
- Large mixing bowl chilled, if possible
- Stand mixer or handheld electric mixer
- Whisk attachment
- Parchment paper
Instructions
Preparing the Cherry Topping
- In a medium-sized saucepan, combine the pitted cherries, granulated sugar, and Kirsch (if using). Heat over medium-high, stirring regularly, until the mixture begins to gently bubble—this may take slightly longer if using frozen fruit.
- Once it reaches a light simmer, lower the heat to medium-low. In a separate bowl, blend water and cornstarch until smooth, then add this slurry to the cherry mixture. Stir frequently as it cooks for an additional 3 minutes, mashing the cherries slightly to release their juices and soften their texture.
- When the sauce has thickened enough to leave a clean path when a spoon is swiped through it, remove from heat. Transfer to a separate container and place in the refrigerator to cool completely. The mixture can be prepared up to one week in advance and kept in a sealed container.
Baking the Fudgy Brownies
- Preheat the oven to 350°F (175°C). Line your metal baking dish with a parchment sling for easier removal after baking.
- In a large mixing bowl, combine the eggs, white sugar, and brown sugar. Beat on high speed for about 60 seconds until the mixture lightens in color and becomes visibly thicker.
- Add the melted butter and vanilla extract, mixing at medium speed until the ingredients are well combined.
- Sift in the flour, cocoa powder, salt, and baking powder. Using a spatula, gently incorporate the dry ingredients into the wet until just blended. Fold in the chocolate chips if desired.
- Transfer the brownie batter to the lined pan and spread into an even layer. Bake for 35–40 minutes, or until a skewer inserted near the center comes out mostly clean with a few moist crumbs. Allow the brownies to cool in the pan completely. For faster cooling, chill in the freezer for 30 minutes after they’ve reached room temperature.
Making the Stabilized Whipped Cream
- While the brownies cool, prepare the whipped topping. Using a chilled bowl and whisk attachment, beat the cold cream cheese on medium-low speed until smooth.
- Add powdered sugar and begin mixing on low, gradually increasing to medium-high once fully incorporated. Scrape down the sides of the bowl as necessary.
- Pour in the vanilla, then slowly stream in the cold heavy cream while mixing on medium-high speed. Add the cream in increments, directing it along the side of the bowl to minimize splatter.
- Continue to whip the mixture until it holds firm peaks—check this by dipping in the whisk and flipping it upright; the cream should maintain its structure. If needed, continue whipping in short 30-second bursts.
Assembling the Black Forest Brownies
- Once fully cooled, lift the brownies from the pan using the parchment sling.
- Spread the stabilized whipped cream across the surface of the brownies in a smooth, even layer.
- Dollop the cherry compote over the whipped cream and gently swirl with a spoon or spatula to create a marbled pattern. Garnish with whole cherries and shavings of dark chocolate, if desired.
- Slice into 16 equal portions using a warm, sharp knife, cleaning the blade between each cut for best results.
Notes
Advance Preparation
These brownies can sit at room temperature for up to 6 hours or be stored overnight in an airtight container. For longer storage, the cherry topping can be refrigerated up to one week in advance. To freeze, first chill uncut brownies until firm, then wrap tightly in plastic followed by foil. Store frozen for up to 2 months. Thaw overnight in the refrigerator, then top with whipped cream and cherries just before serving. Doubling the Recipe
To double the batch, use a 9 x 13-inch pan and bake at 350°F for 40–50 minutes. Expect a slightly thicker brownie but no compromise on flavor. Helpful Tips
These brownies can sit at room temperature for up to 6 hours or be stored overnight in an airtight container. For longer storage, the cherry topping can be refrigerated up to one week in advance. To freeze, first chill uncut brownies until firm, then wrap tightly in plastic followed by foil. Store frozen for up to 2 months. Thaw overnight in the refrigerator, then top with whipped cream and cherries just before serving. Doubling the Recipe
To double the batch, use a 9 x 13-inch pan and bake at 350°F for 40–50 minutes. Expect a slightly thicker brownie but no compromise on flavor. Helpful Tips
- Taste the cherry mixture and adjust Kirsch to your preference.
- Bring all ingredients to room temperature before mixing for the best texture.
- Use a metal pan for even baking. If using glass, reduce oven temperature to 325°F.
- Whip eggs and sugars thoroughly to achieve a shiny, crackly brownie top.
- Chill the brownies before slicing for clean, sharp cuts.
- Dip your knife in hot water and wipe dry between slices for a professional finish.