
Pumpkin Hand Pies are a flaky, portable fall dessert with warmly spiced pumpkin filling, crisp pastry edges, and a cinnamon-sugar finish. They use refrigerated pie crust for convenience, bake in about 15 minutes, and are especially good served slightly warm.
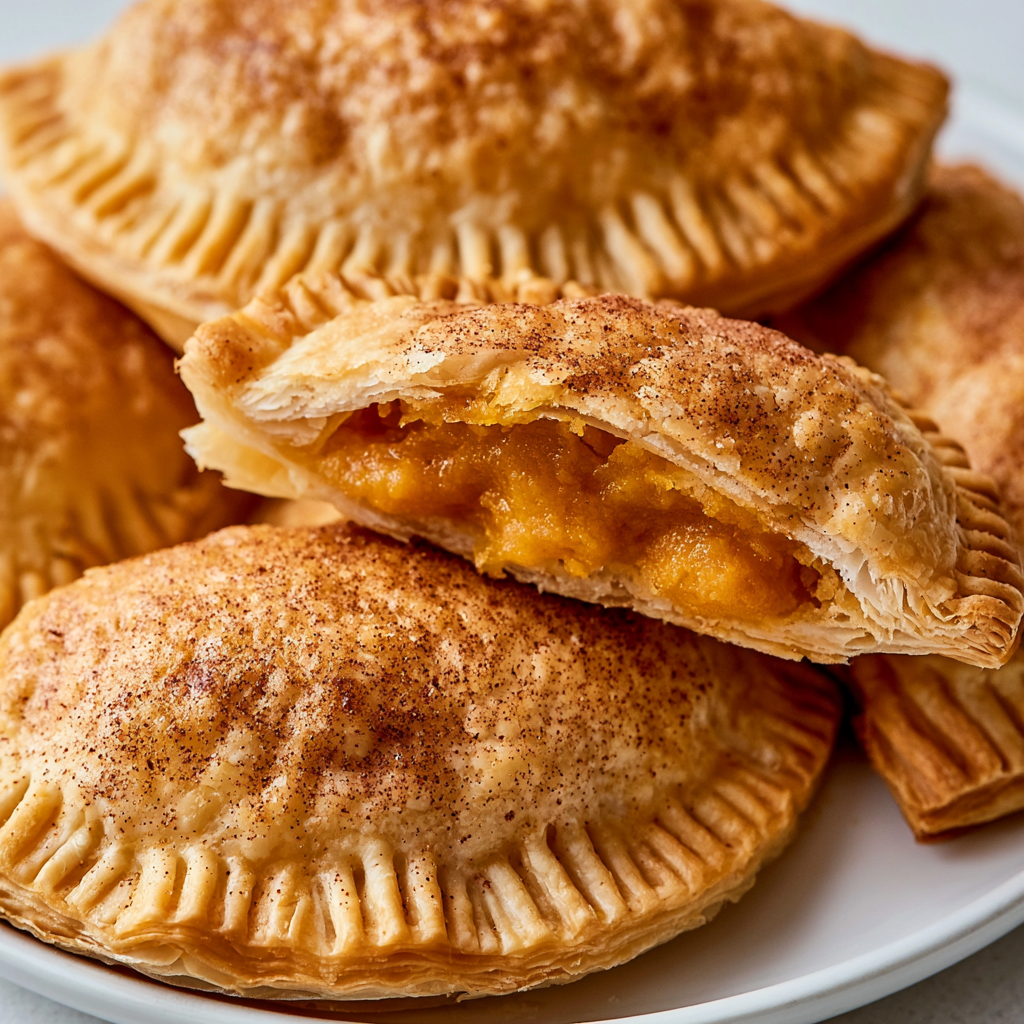
When you want pumpkin pie flavor without slicing and serving a full pie, these individual pastries are a practical choice. Each little turnover holds a sweet pumpkin filling seasoned with pumpkin pie spice, while the pastry bakes into a crisp, golden shell.
The cinnamon and coarse sugar topping adds just enough crunch to contrast with the smooth pumpkin center. Because the filling can be mixed while the oven heats and ready-made pastry keeps prep simple, these hand pies work well for casual fall desserts, holiday gatherings, or an afternoon treat with coffee.
Pumpkin Hand Pies Ingredients
You only need a short list of familiar baking ingredients for these small pumpkin pastries. Keeping the pumpkin mixture chilled while you prepare the dough also makes assembly a little cleaner.
Pure pumpkin purée: Provides the smooth, rich pumpkin base for the filling. Use plain pumpkin purée rather than pumpkin pie filling so you control the sweetness and seasoning.
Granulated sugar: Sweetens the pumpkin without overpowering its flavor.
Pumpkin pie spice: Gives the filling its familiar warm blend of fall spices.
Egg: One egg helps give the pumpkin filling structure as it bakes.
Refrigerated pie crust: Creates the flaky outer pastry without requiring you to prepare dough from scratch.
Beaten egg: Brushed over the assembled pies to encourage an attractive golden surface.
Coarse raw sugar: Adds a light crunch to the baked topping.
Ground cinnamon: Mixed with the coarse sugar for an extra layer of warm spice.

Cooking Steps
STEP 1: Heat your oven to 400°F. Beat one egg in a small mixing bowl, then stir in the pumpkin purée, granulated sugar, and pumpkin pie spice. Mix until the filling looks smooth and evenly seasoned. Place it in the refrigerator while you prepare the pastry.
STEP 2: Lightly flour your work surface and unroll the chilled pie crust. The pastry should be thin enough to fold easily but sturdy enough to contain the filling. If you are working with homemade dough, aim for roughly ⅛ to ¼ inch thick.
STEP 3: Use a round cutter to cut circles from the pastry. Gather the leftover scraps gently, roll them again, and cut additional rounds. Avoid repeatedly working the dough more than necessary, since excessive handling can make pastry less tender.
STEP 4: Place a small spoonful of chilled pumpkin filling in the middle of each pastry circle. Leave a clear border around the edge so the filling does not interfere with sealing. Resist overfilling the pies, even if there appears to be extra pumpkin mixture.
STEP 5: Fold each pastry circle over the filling to form a half-moon shape. Press the edges together firmly, then crimp them with a fork if you want a decorative border. If an edge feels dry or refuses to stay closed, brush it lightly with beaten egg before sealing.
STEP 6: Combine the coarse raw sugar with the ground cinnamon. Brush each assembled hand pie with beaten egg, sprinkle the cinnamon-sugar mixture across the surface, and cut a small steam vent in the top using a knife tip or fork.
STEP 7: Arrange the pies on a baking sheet with a little space between them. Bake at 400°F for about 15 minutes, watching for pastry that is evenly puffed and golden brown. Let the pies cool briefly before serving so the hot pumpkin filling has time to settle.
How to Store & Reheat
Allow leftover hand pies to cool completely before storing them. Once cool, place them in an airtight container and refrigerate for about 3 to 4 days. Separating layers with parchment paper can help protect their surfaces if you need to stack them.
For longer storage, freeze the fully baked and cooled pies in a freezer-safe container for up to about 2 months. Freezing them individually first on a baking sheet can prevent them from sticking together before you transfer them to the container.
For the crispest reheated pastry, warm refrigerated hand pies in a 325°F to 350°F oven until heated through. Frozen pies can be thawed in the refrigerator first and reheated the same way. A microwave will warm them quickly, but the crust generally becomes softer rather than crisp.
Can I prepare these hand pies ahead of time?
Yes. You can mix the pumpkin filling in advance and keep it covered in the refrigerator until you are ready to assemble the pies. You can also assemble the pastries a little ahead of baking and keep them refrigerated so the dough remains cold.
How much pumpkin filling should I put in each pie?
Use a modest spoonful that fits comfortably in the center while leaving roughly a ⅓-inch border around the pastry. The exact amount depends on the size of your cutter. Overfilling makes the edges harder to seal and increases the chance of pumpkin escaping during baking.
Why do I need to cut a vent in the pastry?
The small opening gives steam from the pumpkin filling somewhere to escape as the hand pies bake. Without a vent, pressure can build inside the pastry and encourage the edges to separate or the crust to split in an uncontrolled spot.
Can I use homemade pie dough instead?
Absolutely. Homemade pastry works well as long as it is rolled thin enough to fold without cracking. Aim for approximately ⅛ to ¼ inch thick, and keep the dough cool while you work so the butter or other fat in the pastry does not become overly soft.

How do I know when the hand pies are finished baking?
Look for an evenly golden-brown crust, particularly around the edges and crimped seams. The pastry should look baked rather than pale or doughy. At 400°F, this generally takes around 15 minutes, although exact timing can vary slightly depending on your oven and pastry thickness.
Serving Ideas for Pumpkin Hand Pies
These pastries are especially appealing when served slightly warm, after the pumpkin filling has had a few minutes to cool and set. Their individual size makes them convenient for dessert tables because guests can simply pick one up without plates, slicing, or serving utensils.
Pair them with hot coffee or tea for a simple afternoon dessert where the warm pumpkin spices fit naturally with the drink.
Serve them alongside vanilla ice cream when you want to turn the hand pies into a more substantial plated dessert. Let the pies cool enough that they remain crisp rather than becoming overly soft beneath the ice cream.
For a seasonal dessert spread, pair them with fresh apple slices or another simple fruit side to balance the sweet pumpkin and buttery pastry.
Helpful Tips
- Keep the filling and pastry cool. Chilled filling is easier to portion, while cool pastry tends to hold its shape more reliably during assembly and baking.
- Do not overfill the centers. A smaller amount of pumpkin gives you enough room to create a strong seal and reduces the likelihood of leaking.
- Seal the edges carefully. Press them together before crimping, and use a little beaten egg as adhesive when necessary. A properly sealed border helps keep the filling inside while the pies puff and turn golden in the oven.
Ingredients
Pumpkin Filling
- 1 teaspoon pumpkin pie spice
- 1 cup pure pumpkin purée such as Libby’s
- ¼ cup white granulated sugar
- 1 large egg
Pie Crust
- 1 package chilled ready-to-use pie crust, such as Pillsbury
Topping
- 1 tablespoon coarse raw sugar
- ½ teaspoon ground cinnamon
- 1 large egg lightly beaten
Instructions
- Preheat the oven to 400°F.
- Crack 1 large egg into a small bowl and beat it until blended. Add the pumpkin purée, granulated sugar, and pumpkin pie spice, then stir thoroughly until the filling is evenly combined.
- Transfer the pumpkin mixture to the refrigerator and keep it chilled until needed.
- Unroll the refrigerated pie crust onto a lightly floured work surface. If using homemade pastry instead, roll the dough to approximately ⅛ to ¼ inch in thickness.
- Cut the pastry into circles with a round cutter. Collect the remaining scraps, roll them out again, and continue cutting circles until all available dough has been used.
- Spoon a small amount of pumpkin filling into the center of each pastry circle, keeping approximately a ⅓-inch margin clear around the perimeter.
- Fold each round in half over the filling to create a semicircle. Press the edges together firmly with your fingertips, or crimp the border with the tines of a fork.
- If the pastry edges do not adhere easily, brush them lightly with some of the beaten egg before pressing them closed.
- Combine the raw sugar and ground cinnamon in a small bowl.
- Brush the surface of each hand pie with the remaining lightly beaten egg, then scatter the cinnamon-sugar mixture evenly over the tops.
- Use the point of a knife or the tines of a fork to make a small opening in the top of each pie so steam can escape during baking.
- Arrange the assembled hand pies on a cookie sheet.
- Bake in the preheated 400°F oven for approximately 15 minutes, or until the pastry develops an even golden-brown color.
- Remove the baked hand pies from the oven and allow them to cool slightly before serving.
Notes
- Libby’s pumpkin purée may be used for the filling.
- Pillsbury refrigerated pie crust is a suitable ready-made option.
- Raw sugar provides the topping with a pleasantly crisp texture.