
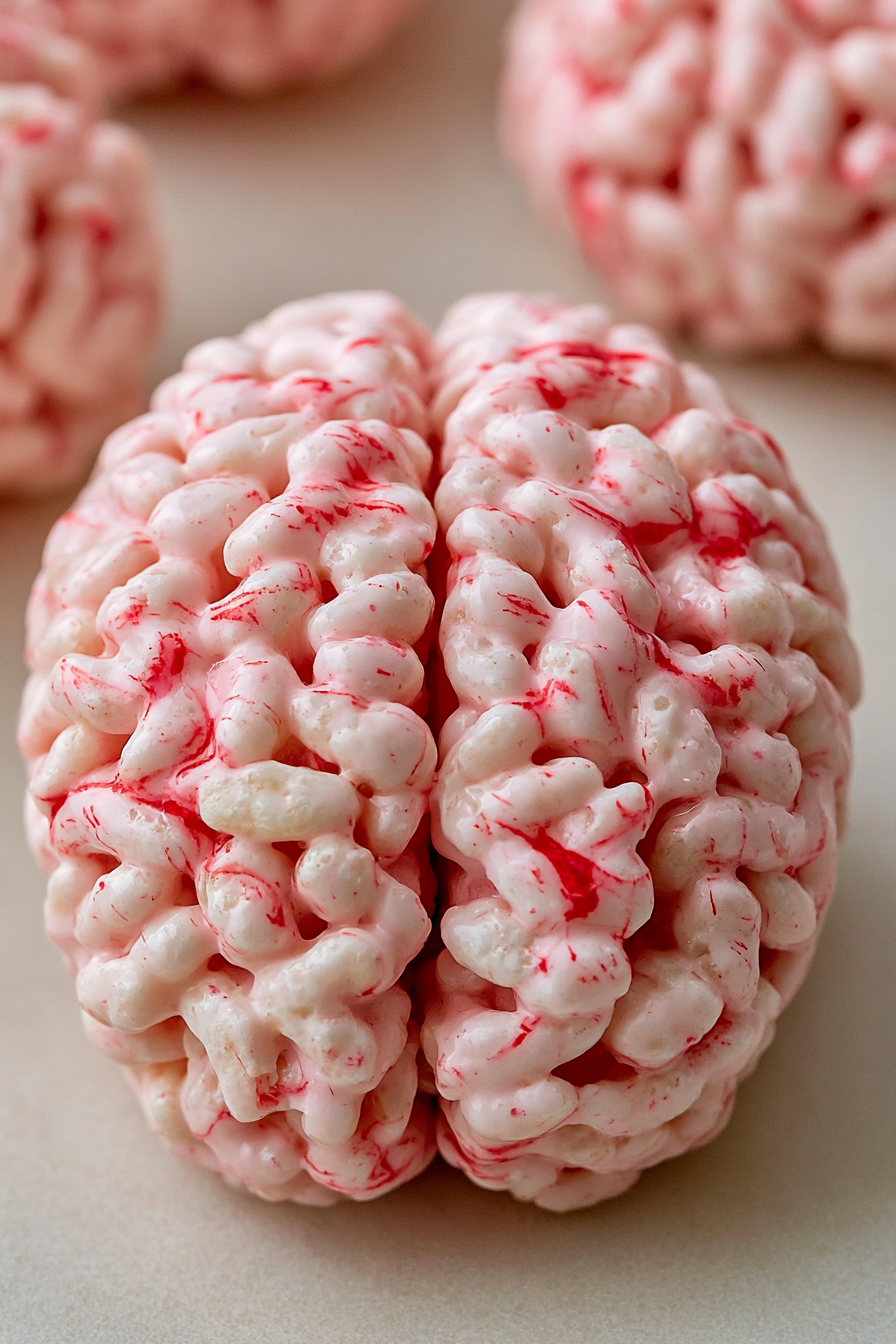
Marshmallow rice krispies halloween brains are a quick, spooky Halloween treat with crisp cereal, chewy marshmallow, buttery flavor, and creepy red vein details. They are simple to shape by hand, fun for parties, and require only a handful of ingredients.

If you want a Halloween dessert that looks impressive without complicated decorating, these cereal treat brains are a great choice. The warm marshmallow mixture is easy to mold into oval shapes, and a simple center groove instantly gives each piece its recognizable brain-like appearance.
The combination works because the melted butter and marshmallows bind the puffed rice together while keeping the centers soft and chewy. Red coloring transforms an otherwise familiar cereal treat into something appropriately eerie, while hand-painted veins add the finishing touch.
They are especially useful for Halloween parties, classroom celebrations, dessert tables, or an afternoon activity with kids. Since every brain is shaped individually, you also do not need to worry about making them perfectly uniform. Slightly uneven shapes actually make the finished treats look more convincing.
Halloween Brain Treat Ingredients
You only need a few familiar ingredients to make these spooky cereal treats. Have everything measured and ready before melting the marshmallows because the mixture becomes firmer as it cools.
- Plain marshmallows: Melt down to create the sweet, sticky base that holds the cereal together.
- Crisp puffed rice cereal: Provides the light crunch and classic cereal-treat texture.
- Unsalted butter: Adds richness and helps produce a smooth marshmallow coating.
- Red food coloring: Tints the marshmallow mixture and creates the painted vein details. Gel coloring is particularly useful because a little goes a long way.
- Salt: Balances the sweetness of the marshmallows and butter.
How to Make Halloween Cereal Brains
STEP 1: Set a heat-safe bowl over a saucepan containing gently simmering water, keeping the bottom of the bowl above the water. Add the butter and marshmallows and stir continuously until everything melts into a smooth, glossy mixture, about 2 to 4 minutes.
STEP 2: Take the bowl away from the heat and immediately stir in the salt. Add red food coloring a little at a time until the marshmallow mixture reaches the shade you want. Mix thoroughly so there are no pale streaks.
STEP 3: Pour the puffed rice cereal into the warm marshmallow mixture. Fold gently with a sturdy spatula until the cereal is evenly coated. Work efficiently because the mixture becomes stickier and more difficult to shape as it cools.
STEP 4: Lightly butter or oil your hands. Scoop out portions of the cereal mixture and press each portion into a compact oval roughly the size of a tennis ball. The shapes do not need to be perfectly smooth or identical.
STEP 5: Press a thumb down the length of each oval to form the characteristic division between the two sides of the brain. A chopstick or wooden spoon handle can also create a narrower, deeper groove.
STEP 6: Leave the shaped treats at room temperature for about 5 to 10 minutes. They should become firm enough to handle without losing their shape while still retaining a pleasantly chewy center.
STEP 7: Dip the tip of a toothpick into red food coloring and draw thin, irregular lines across each treat. Start close to the center groove and branch the lines outward in different directions to mimic veins.

Helpful Tips
- Shape the cereal mixture while it is still warm. Once the marshmallow coating cools completely, forming compact brain shapes becomes much harder.
- Grease your hands lightly rather than heavily. Too much butter or oil can make the surface slippery and prevent the treats from holding their shape.
- Keep the vein patterns irregular. Branching lines of different lengths look much more natural than evenly spaced or symmetrical markings.
Can I make these Halloween treats ahead of time?
Yes. You can prepare them a day before serving as long as they are stored properly at room temperature. Once the cereal brains have completely set, place them in an airtight container so the cereal stays crisp and the marshmallow does not dry out.
If stacking is necessary, place parchment or wax paper between the layers to prevent the decorated surfaces from sticking together.
Why is my marshmallow cereal mixture difficult to shape?
The mixture has probably cooled too much. Marshmallow cereal treats are easiest to mold while they are warm and flexible. Try to have your workspace ready before combining the cereal with the marshmallows so you can begin shaping immediately.
Also avoid packing in extra cereal, since too much can create a dry mixture that does not hold together easily.
Is gel or liquid food coloring better?
Gel food coloring is the better option when available. It delivers stronger color using a small amount, so you can create a vivid Halloween appearance without adding much additional liquid to the melted marshmallow mixture.
Liquid coloring can still work, but add it gradually so you do not unnecessarily loosen the coating.
How do I stop the mixture from sticking to my hands?
Rub a very light coating of butter or neutral cooking oil over your palms and fingers before shaping each brain. You can reapply it whenever the mixture starts sticking again.
Avoid pressing too aggressively when shaping. Gentle but firm pressure is enough to compact the cereal without crushing it.
Can I make smaller brain-shaped treats?
Absolutely. Instead of making tennis-ball-sized portions, divide the mixture into smaller amounts and form miniature ovals. Smaller Halloween cereal brains can be convenient for party trays where guests will be choosing several different desserts.
Just remember that smaller portions cool more quickly, so shape the center grooves soon after forming each oval.
Serving Ideas for Halloween Brain Treats
These spooky treats work particularly well as part of a Halloween dessert spread. Arrange them on a dark platter or simple serving tray so the red coloring and vein details remain the focus.
For a larger party, pair them with Halloween cookies for a mixture of crisp, chewy, and baked treats. Their unusual shape makes them particularly good for filling empty spaces on a dessert table.
You can also serve them alongside fresh fruit if you want something simple and refreshing next to the sweet marshmallow cereal treats.
For individual servings, place each brain in a small paper liner. This makes them easier for guests to pick up without touching the other treats and keeps the decorated surfaces looking neat.
Keeping Leftovers Fresh
Let the finished cereal brains set completely before transferring them to storage. Keep them in an airtight container at room temperature for about 2 to 3 days for the most enjoyable combination of crisp cereal and chewy marshmallow.
Room-temperature storage is preferable to refrigeration. A refrigerator can make marshmallow cereal treats noticeably firmer and may affect their pleasantly chewy texture.
If they do become a little firm, allowing them to sit at room temperature before serving can soften the marshmallow coating slightly.
Freezing is possible, although these treats are at their best when freshly prepared. Wrap individual pieces well and place them in a freezer-safe container for up to 4 to 6 weeks. Thaw them at room temperature while still wrapped or covered to help reduce condensation on the surface.
These spooky marshmallow brains are at their most effective when the shapes are a little imperfect. Deep center grooves, uneven surfaces, and randomly branching red veins all contribute to the creepy Halloween look, so there is no need for precision. Keep the cereal mixture warm while shaping, let your decorations stay irregular, and you will have a memorable Halloween treat made from the simplest cereal-and-marshmallow base.
Marshmallow Rice Krispies Halloween Brains
Ingredients
- 6 cups plain marshmallows preferably a variety that melts smoothly and consistently
- ½ teaspoon salt
- 4 cups crisp puffed rice cereal such as Rice Krispies
- Red food coloring with gel coloring preferred for stronger color without loosening the mixture
- 6 tablespoons unsalted butter softened to room temperature
Instructions
- Melt the butter and marshmallows. Bring a pot of water to a gentle simmer and position a heat-safe bowl over the top, making certain that the bottom of the bowl does not come into contact with the water.
- Place the softened unsalted butter and marshmallows in the bowl. Stir continuously for 2–4 minutes, or until both ingredients have melted together into a completely smooth mixture. Using gentle indirect heat helps the marshmallow base melt evenly without scorching or developing lumps.
- Add the salt and red coloring. Remove the bowl from the heat. Immediately mix in the salt along with enough red food coloring to achieve the desired shade.
- Stir vigorously for approximately 30 seconds so the coloring is distributed evenly throughout the melted marshmallow mixture.
- Coat the puffed rice cereal. Add the puffed rice cereal to the tinted marshmallow mixture. Fold gently yet thoroughly until each piece of cereal is evenly coated.
- Continue working while the mixture remains warm and flexible, as it will become more difficult to shape as it cools.
- Form the brain shapes. Lightly coat your hands with cooking oil or butter to prevent sticking. Scoop out portions of the cereal mixture and mold each one into an oval approximately the size of a tennis ball.
- Press your thumb lengthwise into the center of each oval to form the distinctive central brain groove. For a deeper indentation, a chopstick or the handle of a wooden spoon may be used instead.
- Create the vein details. Allow the shaped treats to firm slightly for 5–10 minutes.
- Dip a toothpick into red food coloring and draw vein-like markings over the surface of each brain. Begin near the central ridge and extend irregular branching lines outward to create a natural-looking, asymmetrical pattern.