
This lemon cheesecake cake layers soft citrus cake, a rich chilled cheesecake center, and smooth lemon cream cheese frosting for a bright, creamy dessert that can be prepared in stages and assembled ahead of serving.
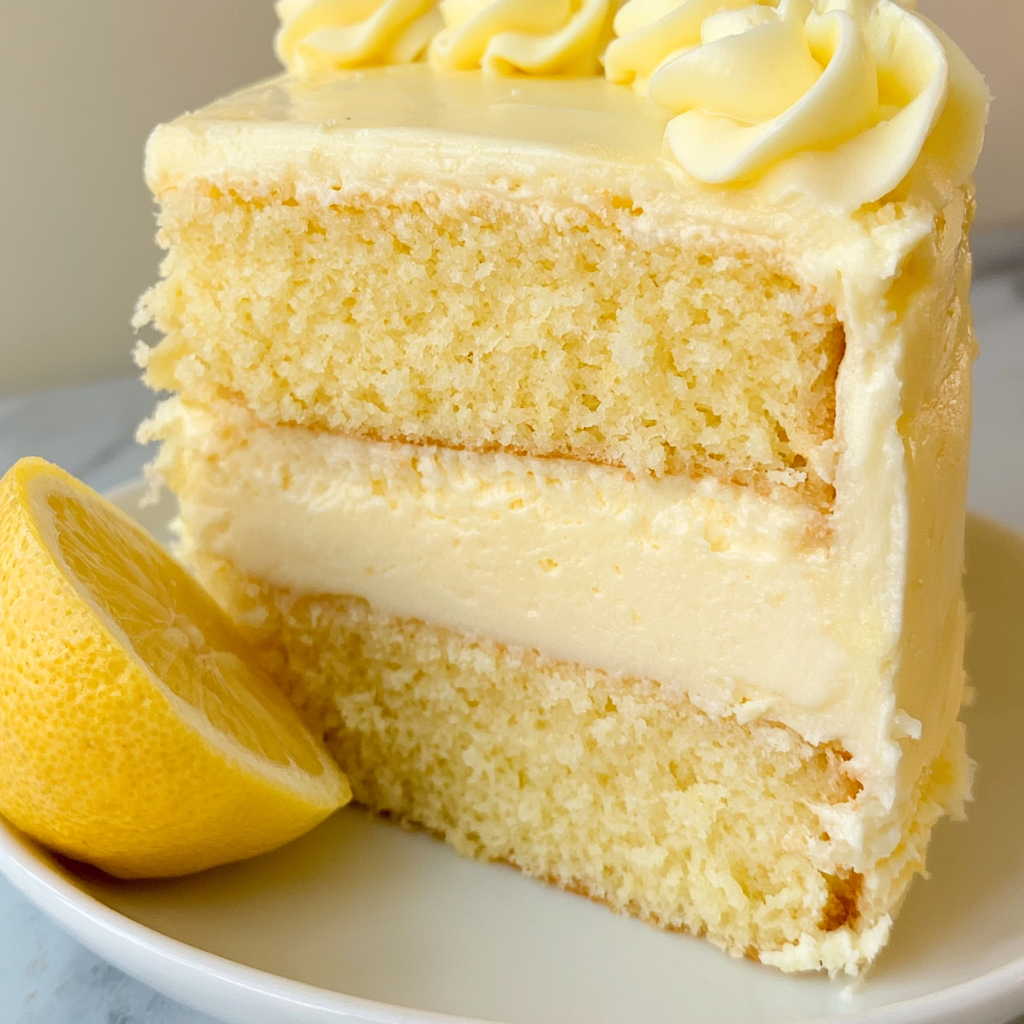
If you love lemon desserts but want something more impressive than a standard layer cake, this one delivers plenty of contrast. The lemon cake layers are tender and light, while the cheesecake in the center is dense, creamy, and gently flavored with lemon.
The recipe also works especially well for celebrations because much of the preparation can happen ahead of time. Chilling the cheesecake thoroughly makes assembly easier, and keeping the frosting slightly cool helps you create neat sides and piped decorations without fighting a soft frosting.
Fresh lemon juice and zest bring natural citrus character to the cake, while lemon extract carries that flavor through the cheesecake and frosting. Once everything is stacked together, every slice has a satisfying combination of soft cake, creamy cheesecake, and tangy cream cheese frosting.
Lemon Cheesecake Layer Cake Ingredients
You will prepare three main components before assembling the cake.
Full-fat cream cheese: Forms the creamy cheesecake center and the base of the frosting. Keeping it only slightly softened helps maintain the right texture.
Sour cream: Adds smoothness and a subtle tang to the cheesecake filling without making it overly heavy.
Granulated sugar: Sweetens both the cheesecake layer and lemon cake while helping produce their respective textures.
Eggs: Give the cheesecake structure and provide richness and lift to the lemon cake layers.
All-purpose flour: A small amount helps stabilize the cheesecake as it bakes.
Cake flour: Keeps the lemon cake layers softer and more delicate than standard all-purpose flour would.
Fresh lemon juice: Adds fresh acidity and citrus flavor directly to the cake batter.
Lemon zest: Provides concentrated lemon aroma without adding additional liquid. Freshly grated zest is especially important in the cake.
Lemon extract: Reinforces the lemon flavor throughout the cheesecake, cake, and cream cheese frosting.
Buttermilk: Provides moisture and a subtle tang while supporting the tender crumb of the cake.
Unsalted butter: Adds richness to the cake and creates the smooth base for the cream cheese frosting.
Vegetable oil: Works alongside the butter to help the cake layers stay soft and moist after cooling.
Baking powder and baking soda: Provide the leavening needed for soft, evenly risen lemon cake layers.
Confectioners’ sugar: Sweetens and thickens the cream cheese frosting so it can be spread and piped.
Salt: Balances the sweetness and helps the citrus flavors taste more distinct.
Yellow gel food coloring: Optional, but a tiny amount can give the frosting a brighter lemon-colored finish.

Cooking Steps
STEP 1: Heat the oven to 300°F and line the bottom of a 9-inch springform pan with parchment. Place a separate pan containing about 1 inch of water on a lower oven rack. The cheesecake will bake on the rack above it, allowing the added moisture to create a gentler baking environment.
STEP 2: Beat the cream cheese until smooth, then mix in the sugar, salt, and flour on low speed. Blend in the sour cream and lemon extract. Add the eggs individually, mixing only until each one disappears into the batter. Pour into the prepared pan and bake for about 45 minutes, until the perimeter looks set but the center still has a slight jiggle.
STEP 3: Turn off the oven and leave the cheesecake inside for another 30 minutes with the door slightly open. Let it finish cooling at room temperature, then cover and chill thoroughly. Refrigerate for at least 5 to 6 hours or overnight, or freeze for 2 to 3 hours when you need a firmer layer for assembly.
STEP 4: For the cake layers, raise the oven temperature to 350°F and grease and flour two 9-inch round pans. Whisk together the cake flour, leavening, salt, and lemon zest. In another bowl, combine the buttermilk, oil, fresh lemon juice, and lemon extract.
STEP 5: Beat the softened butter until creamy, gradually add the sugar, and continue mixing until pale and fluffy. Beat in the eggs one at a time. Alternate the flour mixture with the buttermilk mixture, beginning and ending with the dry ingredients. Divide between the pans and bake for 20 to 24 minutes. Cool for 10 minutes in the pans before transferring the layers to racks.
STEP 6: Make the frosting by beating slightly softened butter until smooth. Add barely softened cream cheese in small pieces and mix until creamy. Blend in the lemon extract and optional zest, then gradually add enough confectioners’ sugar to create a fluffy, spreadable frosting. Add a very small amount of yellow gel coloring if desired.
STEP 7: Place one completely cooled cake layer on your serving plate and cover it with a thin layer of frosting. Release the thoroughly chilled cheesecake from its pan and place it over the cake. Trim the cheesecake carefully if necessary, add another light coating of frosting, and position the second cake layer on top. Frost the entire cake, then finish with piping or simple spatula decorations.
Can I make the cheesecake layer ahead?
Yes. Preparing the cheesecake the day before assembly is actually very helpful. Refrigerating it overnight allows the center to become completely firm, making it easier to remove from the springform pan, transfer onto the cake, and trim neatly if necessary.
Helpful Tips
- Keep the cheesecake cold until you are ready to stack the layers. A well-chilled cheesecake is considerably easier to move without cracking or bending.
- Avoid overmixing after adding the eggs to either batter. Excess mixing can incorporate unnecessary air into the cheesecake and can also affect the final cake texture.
- Keep the butter and cream cheese for the frosting only slightly softened. If the frosting starts becoming loose while you decorate, refrigerate it briefly before continuing.
How do I keep cream cheese frosting firm?
Temperature matters more than excessive amounts of confectioners’ sugar. Begin with butter around cool room temperature and cream cheese that is barely softened. Once mixed, keep the frosting slightly chilled. If your kitchen is warm, refrigerate the frosting or assembled cake briefly whenever it becomes difficult to spread.
Perfect Pairings
Because this dessert already has several rich layers, simple accompaniments work particularly well.
Fresh berries: Strawberries, raspberries, or blueberries provide a fresh contrast to the sweet cream cheese frosting and lemon flavors.
Fresh fruit: A small serving of sliced seasonal fruit keeps the dessert plate light without competing with the cake.
Coffee or tea: A straightforward cup of coffee or lightly flavored tea balances the creamy cheesecake center and makes this cake especially suitable for an afternoon celebration.
Why does the cheesecake need to chill so long?
The center continues setting as the cheesecake cools. Several hours of refrigeration give it enough firmness to behave like a distinct cake layer rather than a soft filling. Proper chilling also makes removing the parchment and transferring the cheesecake much more manageable.
For the cleanest assembly, overnight refrigeration is an excellent option when your schedule allows it.
How to Store & Reheat
Keep the finished cake refrigerated because both the cheesecake center and cream cheese frosting require cold storage. Store it in a covered cake container or loosely cover exposed cut surfaces so the cake does not dry out.
For the best texture, enjoy refrigerated leftovers within about 4 to 5 days. Individual slices can also be frozen. Wrap them carefully and place them in an airtight freezer container for up to about 1 to 2 months. Thaw frozen slices overnight in the refrigerator before serving.
Reheating is not necessary. Instead, you can remove a slice from the refrigerator about 15 to 20 minutes before serving if you prefer slightly softer cake and frosting. Avoid leaving the entire cake at room temperature for extended periods.
How do I get clean slices?
Chilling the assembled cake before slicing gives you the neatest layers. Use a long, sharp knife and dip the blade into hot water before each cut. Wipe it completely dry, make one clean slice, then repeat the warming and wiping process.
This simple method prevents thick cream cheese frosting and cheesecake from building up on the blade. It also helps reveal the three distinct layers rather than dragging crumbs and frosting through each serving.

Can I freeze the assembled cake?
Yes, although freezing individual slices is usually more convenient. Chill the finished cake first so the frosting becomes firm, then wrap it carefully to protect the surface. Thaw it slowly in the refrigerator rather than at room temperature.
If presentation is especially important, another good approach is to make and freeze the cheesecake layer ahead, bake the lemon cake separately, and assemble everything closer to the day you plan to serve it.
Lemon Cheesecake Cake
Ingredients
Cheesecake Layer
- 3/4 cup full-fat sour cream
- 1 teaspoon lemon extract
- 3 large eggs brought to room temperature, approximately 70°F
- 3 tablespoons all-purpose flour
- 16 ounces full-fat cream cheese slightly softened
- 1/4 teaspoon salt
- 1 cup white granulated sugar
Lemon Cake Layers
- 1/4 cup freshly squeezed lemon juice
- 3 cups cake flour
- Finely grated zest from 2 lemons
- 1 1/4 cups buttermilk
- 3 large eggs
- 1/2 teaspoon baking soda
- 1 tablespoon lemon extract
- 1 1/2 sticks 12 tablespoons unsalted butter, softened
- 2 teaspoons baking powder
- 1/4 cup vegetable oil
- 1/2 teaspoon salt
- 2 cups granulated sugar
Lemon Cream Cheese Frosting
- 1 teaspoon lemon extract
- 6 to 6 1/2 cups confectioners’ sugar
- 2 sticks unsalted butter only slightly softened to approximately 65°F
- Yellow gel food coloring optional
- 16 ounces full-fat cream cheese barely softened
- Finely grated zest from 1 lemon approximately 1 1/2 teaspoons, optional
For Assembly and Decorating
- Disposable piping bag fitted with a 2D piping tip
- Small offset spatula
- Prepared lemon cake layers
- Chilled cheesecake layer
- Prepared lemon cream cheese frosting
Instructions
- Place a pan containing approximately 1 inch of water on a lower oven rack. This provides moisture during baking and helps reduce the likelihood of cracks forming in the cheesecake.
- Preheat the oven to 300°F.
- Cut a parchment-paper circle to fit the base of a 9-inch springform pan and line the bottom of the pan.
- Place the slightly softened cream cheese in a mixing bowl and beat until completely smooth.
- Add the granulated sugar, salt, and all-purpose flour. Mix on low speed until evenly incorporated.
- Blend in the sour cream and lemon extract until the mixture is uniform.
- Add the room-temperature eggs one at a time, mixing after each addition until incorporated.
- Transfer the cheesecake batter to the parchment-lined springform pan.
- Position the springform pan on the oven rack directly above the pan of water. Bake for 45 minutes, or until the cheesecake is set around the edges while retaining a slight jiggle in the center.
- Turn the oven off and leave the cheesecake inside for an additional 30 minutes, keeping the oven door slightly open so the cheesecake can cool gradually.
- Remove the cheesecake and allow it to finish cooling on the countertop. Once cooled, cover it and freeze for 2–3 hours, or refrigerate for at least 5–6 hours. Refrigerating overnight is also suitable.
- Preheat the oven to 350°F. Grease and flour two 9 × 2-inch round cake pans.
- In a medium bowl, whisk the cake flour, baking powder, baking soda, salt, and fresh lemon zest together for approximately 30 seconds. Set the dry mixture aside.
- In a separate bowl, stir together the buttermilk, vegetable oil, freshly squeezed lemon juice, and lemon extract.
- Using a stand mixer, beat the softened unsalted butter until smooth.
- Gradually incorporate the granulated sugar and continue beating until the butter mixture becomes pale, light, and fluffy.
- Add the eggs individually, mixing thoroughly after each one.
- Add the dry and liquid mixtures alternately. Begin with the flour mixture, follow with the buttermilk mixture, and continue until everything has been added, using three additions of the dry mixture and two additions of the liquid mixture. Finish with the dry ingredients.
- Mix only until the batter is combined; avoid excessive mixing.
- Distribute the batter evenly between the two prepared cake pans.
- Bake for 20–24 minutes, or until a toothpick inserted into the center emerges clean or with only a few moist crumbs attached.
- Allow the cake layers to rest in their pans for 10 minutes, then carefully turn them out onto cooling racks and let them cool completely.
- Place the slightly softened butter in the mixer bowl and beat until smooth.
- Cut the barely softened cream cheese into smaller pieces. Add the pieces to the butter and mix until the frosting base becomes smooth and creamy.
- Blend in the lemon extract. Add the optional fresh lemon zest at this stage if a stronger citrus note is desired.
- Gradually incorporate 6 to 6 1/2 cups of powdered sugar, beating until the frosting reaches a smooth, fluffy consistency.
- For a brighter yellow appearance, blend in a small quantity of yellow gel food coloring if desired.
- Keep the frosting slightly chilled for the best spreading and piping consistency. If preparing it in advance, refrigerate it and remix briefly before decorating the cake.
- Set one completely cooled lemon cake layer on a serving plate or cake pedestal.
- Apply a thin coating of lemon cream cheese frosting across the top of the cake layer.
- Carefully run a thin knife around the perimeter of the chilled cheesecake to release it from the springform pan. Warming the knife with hot water can make this process easier and help reduce sticking.
- Release and remove the springform pan sides. Carefully invert the chilled cheesecake onto the frosted lemon cake layer.
- Remove the base of the springform pan and gently peel away the parchment paper.
- If the cheesecake extends beyond the edges of the lemon cake, carefully trim the excess with a warmed knife so the layers are even.
- Spread another thin coating of lemon cream cheese frosting over the cheesecake layer.
- Position the second lemon cake layer over the cheesecake.
- Cover the top and sides of the assembled cake with the remaining lemon cream cheese frosting. If either the cake or frosting becomes too soft while decorating, chill it as needed before continuing.
- Finish the cake using the small offset spatula. If decorative piping is desired, transfer frosting to a disposable piping bag fitted with a 2D piping tip and add the final decorations.