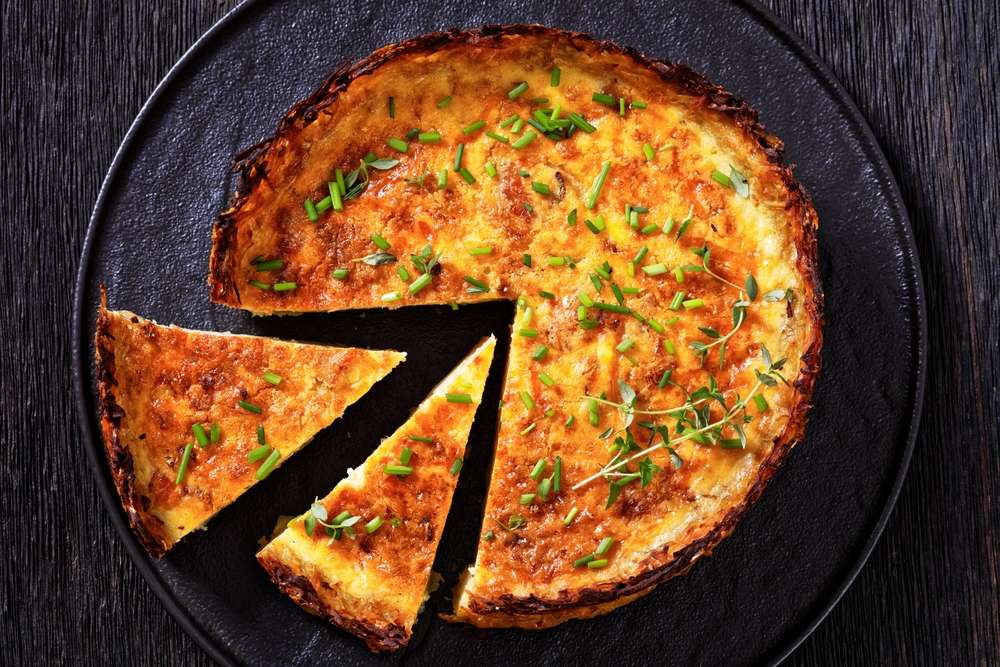
Hash Brown Crust Bacon Cheddar Quiche delivers a crisp potato crust, smoky bacon, and melty cheddar in a make-ahead brunch stunner.

Think of this as a cross between a loaded baked potato and a classic quiche—only the pie crust is swapped for a golden hash brown shell that stays shatter-crisp. You’ll press thawed shreds into a springform pan, par-bake until set, then pour in a silky egg custard dotted with caramelized onions, bacon, and sharp white cheddar.
It’s a true crowd-pleaser, and it’s weekender-friendly: you can assemble ahead, reheat beautifully, and slice clean wedges that hold together like a dream.
Hash Brown Bacon Cheddar Quiche Ingredients
- Frozen hash browns (thawed) — Your sturdy, ultra-crisp “crust.”
- White cheddar (shredded) — Sharp, melty richness in both crust and filling.
- Eggs — The custard’s backbone; whisked for a tender, just-set center.
- Heavy cream or whole milk — Silky texture and gentle richness.
- Bacon (cooked, crumbled) — Smoky, salty pops throughout every slice.
- Onion (thinly sliced) — Lightly caramelized for sweetness and depth.
- Butter — For sautéing onions and extra flavor.
- Chives — Fresh, oniony finish (plus a handful for garnish).
- Salt & pepper — Season in layers; taste as you go.
Step-by-Step Hash Brown Bacon Cheddar Quiche
- Make the crust. Squeeze thawed hash browns very dry. Mix with a little cheddar, salt, and pepper. Press firmly up the sides and across the bottom of a greased 9-inch springform, patching any gaps. Freeze 1 hour to set.
- Par-bake. Bake the frozen crust at 425°F (220°C) for 15 minutes until edges turn light golden. Cool slightly.
- Caramelize onions. In butter over medium heat, cook onions with a pinch of salt and pepper 10–15 minutes until soft and lightly golden. Cool.
- Whisk the custard. Beat eggs with cream (or milk) until frothy. Stir in caramelized onions, most of the cheddar, most of the bacon, and chives. Season to taste.
- Fill & bake. Pour into the warm crust. Reduce oven to 375°F (190°C) and bake 25–30 minutes, until the center is just set with a slight wobble.
- Crisp the sides. Run a paring knife around the pan, release the ring, and return the quiche to the oven 10–15 minutes to further crisp the exposed crust sides.
- Rest & serve. Cool 10 minutes. Top with remaining bacon and chives, slice, and serve warm.
What to Serve with This Quiche
- Simple greens with lemon-Dijon vinaigrette to cut the richness.
- Fresh fruit (citrus, berries, melon) for bright, juicy contrast.
- Roasted asparagus or tomatoes for an effortless, savory side.
Can I use fresh potatoes instead of frozen hash browns?
Yes—grate russets or Yukon Golds, then rinse, wring very dry in a towel, and weigh or measure to match. Removing moisture is the key to a crisp, non-soggy crust.
How do I keep the crust from leaking?
Press the shreds firmly so there are zero gaps, especially where the base meets the sides. Freezing before baking helps “set” the structure; patch any thin spots after par-bake if needed.
Can I lighten the custard?
Use whole milk instead of cream, or a 50/50 mix. The texture will be slightly less plush but still tender. Avoid low-fat milk; it can turn watery and rubbery.
Can I make it vegetarian?
Absolutely. Omit bacon and add a cup of sautéed mushrooms or spinach (well-drained). Keep total add-ins modest so the custard sets cleanly.
How far ahead can I assemble?
Par-bake the crust and caramelize onions up to 24 hours ahead. You can also bake the whole quiche, cool, and reheat (instructions below) just before serving.
Pro Tips for Crisp-Crust Success
- Squeeze, then squeeze again. Drier shreds = crisper crust.
- Use a measuring cup. The flat bottom presses the crust evenly into corners and up the sides.
- Season in layers. Lightly salt the crust, the onions, and the custard for balanced flavor.
Keeping Leftovers Fresh
- Fridge: Wrap and refrigerate slices up to 3 days.
- Reheat: Bake at 350°F (175°C) for 15–20 minutes (foil-loosely if browning too fast) until warmed through; the crust re-crispens nicely.
- Freeze whole or in wedges: Freeze solid, wrap tightly, and keep up to 3 months. Reheat from frozen at 425°F (220°C) for 30–35 minutes (whole) or 18–22 minutes (wedges) until hot and crisp.
Enjoy the best parts of brunch in one slice: a crunchy potato shell, creamy custard, smoky bacon, and a shower of chives. It’s the dish that always comes back clean.
Hash Brown Crust Bacon Cheddar Quiche
Ingredients
For the Crust:
- 20 ounces of defrosted shredded hash brown potatoes
- ½ cup finely grated sharp white cheddar
- ½ teaspoon fine salt
- ¼ teaspoon coarsely ground black pepper
For the Filling:
- 2 tablespoons of unsalted butter
- ½ medium yellow onion thinly sliced
- 6 whole eggs gently whisked
- ½ cup heavy whipping cream or full-fat milk
- 4 slices of bacon cooked until crisp and crumbled
- 1 tablespoon of finely chopped fresh chives plus extra for garnish
- 1 cup shredded white cheddar
- Salt and freshly cracked black pepper to taste
Instructions
- Drain excess moisture thoroughly from the thawed hash browns using a clean kitchen towel or paper towels. Transfer to a mixing bowl and combine with grated cheddar, salt, and pepper. Mix until well incorporated.
- Lightly coat a 9-inch springform pan with non-stick spray. Press the hash brown mixture into the base and up the sides of the pan, ensuring there are no gaps or holes. This forms the crust and prevents leakage during baking.
- Transfer the prepared pan to the freezer and chill for a minimum of 1 hour.
- Preheat the oven to 425°F (218°C). Take the frozen crust from the freezer and place it directly into the oven. Bake for 15 minutes to partially cook the base. Remove and let it cool slightly.
- Meanwhile, in a sauté pan set over medium heat, melt the butter. Add the onion slices and cook, stirring occasionally, until golden and softened, approximately 10 to 15 minutes. Season lightly with salt and pepper, then set aside to cool.
- In a large bowl, whisk together the eggs and cream until light and smooth. Stir in the caramelized onions, crumbled bacon, grated cheddar, and chopped chives. Season to taste with salt and pepper.
- Pour the egg mixture into the pre-baked crust, smoothing the top evenly.
- Reduce oven heat to 375°F (190°C). Return the pan to the oven and bake for 25 to 30 minutes, or until the center is just set and no longer jiggles.
- Carefully remove the pan and run a small knife along the inner edge to loosen the crust. Detach the springform collar and place the quiche back in the oven for an additional 10 to 15 minutes, allowing the sides to crisp fully.
- Let the quiche rest at room temperature for about 10 minutes before slicing. Garnish with extra chives and serve warm.
Notes
Once fully baked and cooled, place the quiche uncovered in the freezer until solid. Then wrap it tightly with foil or plastic. When ready to reheat, preheat oven to 425°F (218°C), place quiche on a greased baking tray, and bake for 30 to 35 minutes until heated through and crisp on the outside. For Individual Portions:
Cool the quiche entirely, cut into wedges, freeze the pieces uncovered, then individually wrap each in foil or plastic wrap for storage. Reheat as needed. Tips for Best Results:
For optimal results, consume within 3 months of freezing. Carefully ensure the crust is solid and free of gaps to avoid any leakage. Pressing the crust in with the base of a glass or measuring cup helps create a smooth, even layer.