
Graveyard Dirt Cake Cups are a fun, make-ahead Halloween dessert with creamy chocolate pudding, crushed chocolate cookies, syrupy “fresh dirt,” and spooky candy decorations. They’re simple to assemble, easy to serve, and perfect for parties.
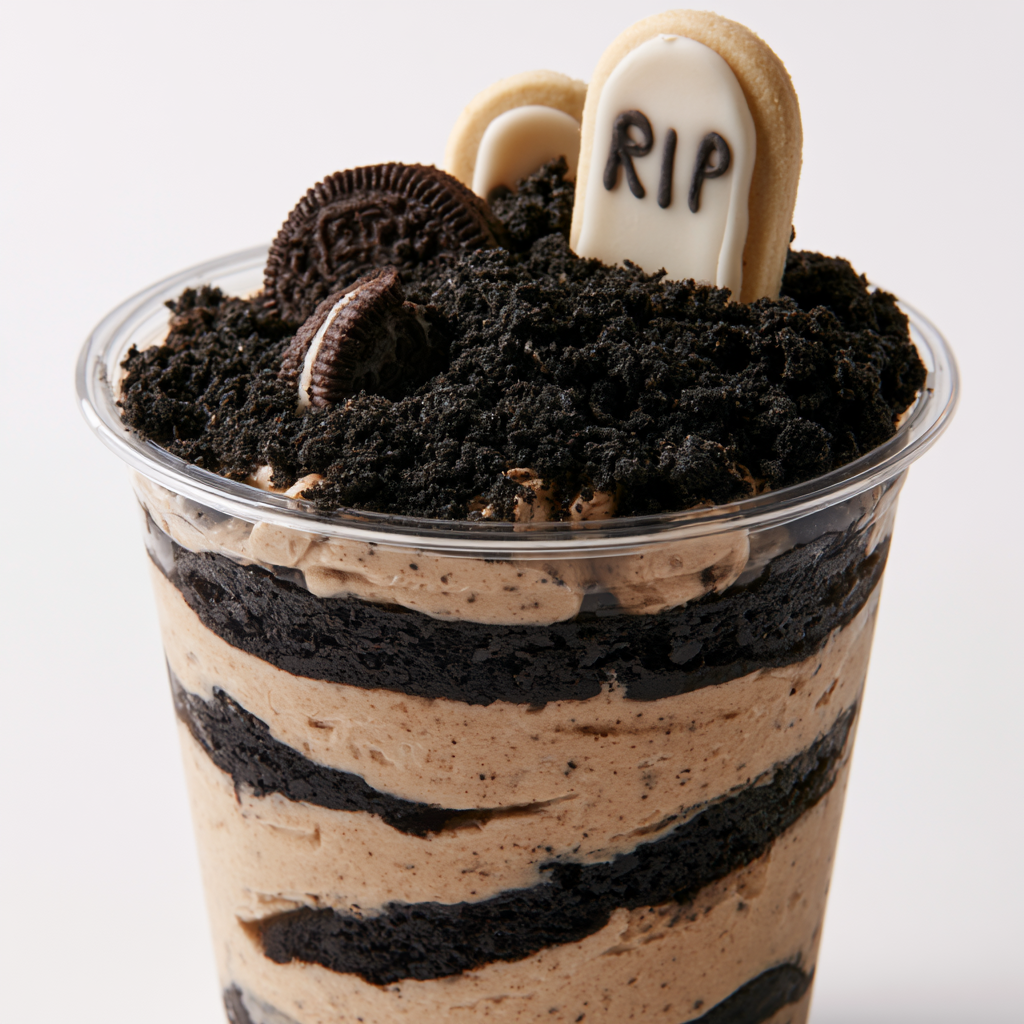
If you want a Halloween dessert that looks impressive without requiring baking, these individual dirt cups are a great choice. Each serving gives you layers of fine chocolate cookie crumbs and fluffy chocolate pudding, with extra chocolate syrup adding rich ribbons throughout the filling.
The real fun comes when you decorate the tops. Cookie gravestones, marshmallow ghosts, little pumpkin candies, sprinkles, and clumpy chocolate “soil” turn simple pudding cups into miniature graveyard scenes. Since the recipe makes about 18 portions, it is especially useful for Halloween parties, school celebrations, or a spooky dessert table.
You can also prepare most of the components ahead of time and keep the cups chilled until the decorations are added. That makes party-day preparation much more manageable.
Graveyard Dirt Cake Cups Ingredients
Chocolate sandwich cookies: Finely crushed cookies create both the layered “dirt” and the textured soil scattered over the finished cups.
Cold whole milk: Provides the liquid base for the instant chocolate pudding and helps it set to a thick consistency.
Instant chocolate pudding mix: Creates a smooth, chocolatey filling without any stovetop cooking.
Whipped topping: Folded into the pudding to make the filling lighter, fluffier, and easier to layer.
Chocolate syrup: Half is swirled into the pudding while the rest moistens cookie crumbs for the freshly disturbed dirt effect.
Milano-style cookies: Their long oval shape makes them ideal for turning into edible gravestones.
Black decorating icing: Used to write simple messages such as “RIP” on the cookie grave markers.
Ghost-shaped marshmallow treats: Add an instantly recognizable spooky character to each decorated cup.
Mini pumpkin candies: Bring color to the otherwise chocolate-heavy dessert and reinforce the Halloween theme.
Halloween sprinkles: Scatter these over the finished cups for extra seasonal detail and texture.
Helpful Tips
- Process the cookies until the majority are finely crushed. Smaller crumbs create cleaner layers, while a few slightly larger bits are fine for the decorative dirt topping.
- Fold the whipped topping gently into the pudding rather than stirring aggressively. This helps preserve the lighter, mousse-like texture of the filling.
- Add tall decorations close to serving time if the cups will sit in the refrigerator for several hours. This helps cookie gravestones stay firmer and keeps the finished presentation neat.

Step-by-Step Graveyard Dirt Cake Cups
STEP 1: Crush the chocolate sandwich cookies in a food processor, working in batches if necessary. Pulse until you have fine, soil-like crumbs, then transfer them to a large bowl. Set aside enough crumbs for all of the layers and the final moist dirt topping.
STEP 2: Pour 4 cups of cold whole milk into a large mixing bowl. Add the two packages of instant chocolate pudding and whisk for about 2 minutes. The mixture should begin noticeably thickening as you whisk.
STEP 3: Add the thawed whipped topping to the pudding. Fold it in carefully with a spatula until the mixture is smooth and evenly combined, with no large streaks of whipped topping remaining.
STEP 4: Pour 1/2 cup of the chocolate syrup over the pudding mixture. Fold it through only a few times. You are looking for visible chocolate ribbons rather than a completely uniform filling. Place the pudding in the refrigerator while you organize the cups and crumbs.
STEP 5: Arrange 18 individual cups of approximately 9 ounces each. Spoon about 2 tablespoons of cookie crumbs into the bottom of every cup. Gently tap each cup against the work surface if you want a flatter, more defined layer.
STEP 6: Spoon slightly less than 1/4 cup of chocolate pudding filling over the crumbs in each cup. Add another layer of roughly 2 tablespoons of crushed cookies, then divide the remaining pudding among the cups. Finish the surface with approximately 1 tablespoon of fine crumbs per serving.
STEP 7: Combine the cookie crumbs that remain with the reserved 1/2 cup of chocolate syrup. Stir until the mixture becomes moist and forms irregular clumps. Avoid pressing it completely smooth because the uneven texture is what makes it resemble freshly turned soil.
STEP 8: Write “RIP” or another short Halloween message on the Milano-style cookies using black decorating icing. Carefully push a cookie into each cup to create a standing gravestone. Arrange ghost marshmallow treats and mini pumpkin candies nearby, then scatter sprinkles and clumps of the moist cookie dirt around the decorations. Refrigerate until serving or enjoy right away.
Can I make these Halloween dirt cups ahead of time?
Yes. The pudding and cookie layers can be assembled ahead and kept covered in the refrigerator until you are ready to serve them. For the cleanest presentation, consider waiting to insert the cookie gravestones and other decorations until closer to party time.
This is especially helpful when you are making all 18 cups for a larger Halloween gathering because most of the messy assembly work can be finished in advance.
How do I keep the cookie gravestones from getting soft?
Insert the gravestone cookies shortly before serving rather than leaving them in the pudding overnight. Moisture from the pudding will gradually soften cookies placed directly into the dessert.
You can still assemble and chill the pudding cups ahead of time, then quickly add the gravestones, ghosts, pumpkins, and final dirt just before guests arrive.
Can I make fewer than 18 cups?
Absolutely. The recipe is designed for approximately 18 individual 9-ounce cups, but smaller containers can stretch the mixture into additional servings. You can also make fewer, more generously filled cups.
If you are planning a dessert table with several sweets, smaller clear cups can be especially practical because guests can sample the dirt cake without committing to a large dessert.
Do the cups have to be fully decorated?
No. Decorating every serving differently can actually make the dessert table look more interesting. You might give half the cups cookie gravestones and ghosts while finishing the others with pumpkin candies, sprinkles, and extra cookie dirt.
Keeping some cups simple also speeds up preparation when you are making a large batch.
Perfect Pairings
These chocolate dirt cups work especially well as part of a Halloween dessert spread. Pair them with simple sugar cookies decorated in seasonal shapes for a lighter contrast to the creamy pudding.
Fresh fruit is another useful addition, particularly strawberries, grapes, or orange segments, since their brightness balances the rich chocolate layers.
For a larger party table, you can also serve the cups alongside plain popcorn or lightly sweetened popcorn, giving guests something crisp and less rich between desserts.

Keeping Leftovers Fresh
Keep leftover dirt cake cups covered in the refrigerator. For the best texture and appearance, enjoy them within about 2 to 3 days. The pudding will remain chilled and creamy, although the cookie layers gradually soften as they absorb moisture.
If you know some cups will be stored rather than served immediately, leave off the cookie gravestones and marshmallow decorations. Add those after refrigeration so they retain more of their original texture.
Freezing is not recommended for fully assembled cups. The pudding and whipped topping can change consistency after thawing, and the cookie crumbs may become overly soft.
These cups are meant to be served cold, so there is no reheating required. Simply take them from the refrigerator, add any final Halloween decorations you saved for the last minute, and serve.
With their rich chocolate pudding, layered cookie crumbs, and playful graveyard decorations, these individual desserts give you plenty of Halloween impact without complicated baking or decorating techniques. The combination of make-ahead convenience and customizable toppings also makes them particularly useful when you need a festive dessert for a crowd.
Graveyard Dirt Cake Cups
Ingredients
For the chocolate pudding filling:
- 4 cups cold whole milk
- 16 ounces whipped topping thawed
- 2 packages instant chocolate pudding mix 3.9 ounces each; Jell-O or a comparable brand
For the cookie crumb layers:
- 1 cup good-quality chocolate syrup divided into two 1/2-cup portions
- 2 family-size packages Oreo cookies 19.1 ounces each
For the graveyard decorations:
- Ghost-shaped marshmallow treats such as Peeps
- Milano cookies
- Assorted Halloween sprinkles
- Mini pumpkin-shaped candies
- Black decorating icing for cookies such as Betty Crocker
Instructions
- Prepare the Oreo crumbs. Working in batches, place the two packages of Oreo cookies in a food processor and pulse until they are reduced to fine crumbs. Transfer all of the crumbs to a large bowl and reserve them for assembling the desserts.
- Prepare the chocolate pudding filling. Pour the 4 cups of cold whole milk into a large mixing bowl and add both packages of instant chocolate pudding mix. Whisk for approximately 2 minutes, or until the pudding begins to thicken.
- Incorporate the whipped topping. Carefully fold the 16 ounces of thawed whipped topping into the thickened pudding until evenly blended and no visible streaks remain.
- Add the first portion of chocolate syrup. Drizzle 1/2 cup of the chocolate syrup over the pudding mixture. Fold or swirl it gently only a few times, leaving visible ribbons of syrup throughout the filling rather than blending it completely. Refrigerate the mixture until assembly.
- Begin assembling the cups. Arrange 18 serving cups, each with a capacity of approximately 9 ounces. Spoon 2 tablespoons of the Oreo crumbs into the bottom of every cup.
- Add the pudding layer. Place slightly less than 1/4 cup of the prepared chocolate pudding mixture over the first crumb layer in each serving cup.
- Repeat the layers. Add another 2 tablespoons of Oreo crumbs to each cup, followed by the remaining pudding mixture. Finish each portion with 1 tablespoon of fine Oreo crumbs on top.
- Prepare the moist “fresh dirt” crumbs. Transfer the remaining Oreo crumbs to a small bowl and stir in the reserved 1/2 cup of chocolate syrup. Mix until the crumbs become moist, irregular, and slightly clumped. Set them aside for the final decoration.
- Create the gravestones. Using the black decorating icing, write “RIP” or other Halloween-themed wording on the Milano cookies. Carefully insert the decorated cookies into the tops of the dessert cups so they stand upright like grave markers.
- Add the Halloween decorations. Position the ghost-shaped marshmallow treats and mini pumpkin candies on top of the cups, pressing them gently into the surface so they remain upright.
- Finish the graveyard effect. Scatter assorted Halloween sprinkles over the desserts, then distribute some of the clumpy chocolate-cookie mixture around the decorations to resemble freshly disturbed soil.
- Chill and serve. Refrigerate the completed Graveyard Dirt Cake Cups until serving time, or serve them immediately after decorating.