
Eyeball Deviled Eggs are a creepy, make-ahead Halloween appetizer with creamy mustard filling, crimson color, olive pupils, and crisp cracker bases. They are simple to assemble, convenient to serve, and reliably eye-catching.
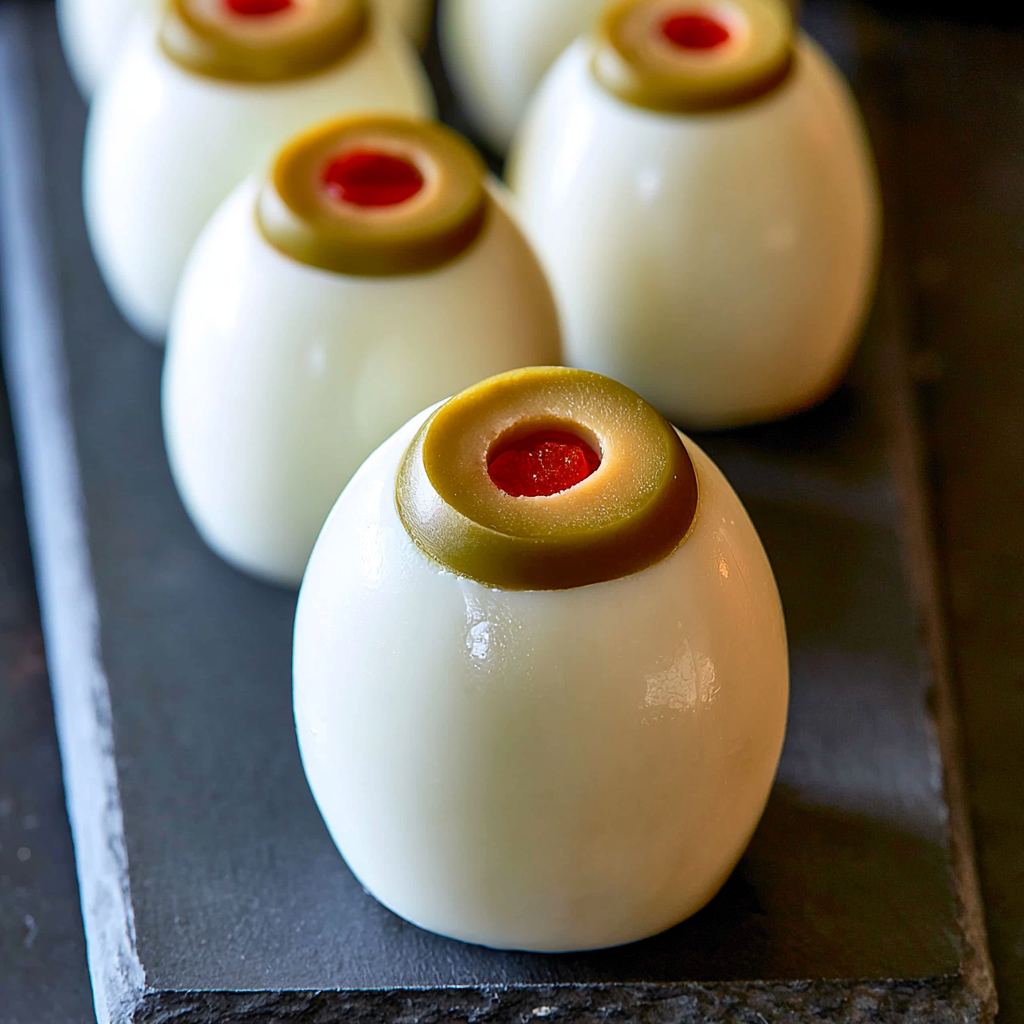
These spooky bites are a fun choice when you need Halloween party food that looks impressive without requiring complicated decorating skills. Each egg is assembled upside down, allowing the pimento-stuffed olive to sit prominently on top like a realistic pupil.
The smooth yolk filling combines mayonnaise with spicy brown mustard for a creamy texture and a gentle tang. A few drops of red food coloring or beet juice transform the filling into a dramatic crimson layer that gives the eggs their eerie appearance.
A thin toasted bread round or rice cracker supports each filled egg and adds a welcome crisp contrast. You can prepare several components ahead of time, then complete the final assembly shortly before guests arrive.
What You Need for These Halloween Eggs
Large eggs: Form the sturdy egg-white shells and provide the yolks for the creamy filling.
Mayonnaise: Adds moisture and richness, helping the strained yolks become smooth enough to pipe or spoon.
Spicy brown mustard: Gives the filling a sharper, more savory flavor than plain mustard.
Red food coloring or beet juice: Tints the yolk mixture to create the crimson center of each eyeball.
Pimento-filled cocktail olives: Become the colorful pupils and provide a briny contrast to the rich egg filling.
White sandwich bread: Can be cut, flattened, and toasted into crisp rounds that hold the eggs upright.
Rice crackers: Offer a convenient alternative when you want to skip cutting and toasting the bread.
Salt and freshly ground pepper: Balance the richness and allow you to adjust the filling to your taste.

Cooking Steps
STEP 1: Place the eggs in a saucepan and cover them completely with cool water. Bring the water to a full boil, then continue cooking for 20 minutes. Transfer the eggs immediately to a bowl of cold water and leave them for 2–5 minutes so they cool enough to handle.
STEP 2: Carefully peel the cooled eggs, trying to keep the whites as smooth and unbroken as possible. Slice each egg lengthwise into two matching halves. Lift out the yolks gently and place them in a fine-mesh strainer positioned over a mixing bowl.
STEP 3: Press the yolks through the strainer with the back of a spoon. This extra step removes firm pieces and creates a fine texture that blends easily. Stir in the mayonnaise, spicy brown mustard, salt, and pepper until the filling is thick, creamy, and similar in consistency to smooth hummus.
STEP 4: Add the red food coloring or beet juice and mix until the color is evenly distributed. Taste the mixture and adjust the seasoning if needed. Transfer it to a pastry bag or cover the bowl tightly while you prepare the remaining pieces so the surface does not become dry.
STEP 5: When using bread, heat the oven to 350°F. Cut 12 small circles from the sandwich bread with a round cutter. Flatten each circle into a thin wafer, arrange the rounds on a baking sheet, and toast them for 5–7 minutes until dry and crisp. Allow them to cool before assembly. Skip this step when using rice crackers.
STEP 6: Use the wide end of a pastry tip to cut a small opening in the rounded top of each egg-white half. Remove the little white circle and cut it into two pieces. Return one piece to the opening as a support. Slice the olives crosswise into thick rounds, then position one olive slice over each support.
STEP 7: Turn an olive-topped egg half upside down and pipe or spoon the crimson yolk filling into the open cavity. Avoid adding so much that it extends beyond the edges. Press a toasted bread round or rice cracker gently onto the filling, then carefully turn the egg upright. Repeat with the remaining halves.
Can I prepare the components in advance?
Yes. You can boil and peel the eggs, make the filling, toast the bread rounds, and slice the olives several hours ahead. Refrigerate the eggs and filling in separate airtight containers, and keep the toasted bases at room temperature so they remain crisp.
Helpful Tips
- Pressing the yolks through a fine-mesh strainer produces a smoother filling and makes it much easier to pipe neatly into the egg whites.
- Choose olives with centered pimentos whenever possible. A visible red center makes each olive slice resemble a pupil and iris more clearly.
- Chill the egg halves before assembling them. Firm, cold whites are easier to trim and less likely to tear while you insert the olive supports.
Can beet juice replace the red food coloring?
Beet juice works well as a naturally colored alternative, but add it sparingly. Too much liquid can loosen the filling and make assembly difficult. Begin with a few drops, mix thoroughly, and add more only when a deeper crimson shade is needed.
Serving Ideas for Eyeball Eggs
Serve these Halloween deviled eggs as the centerpiece of a themed appetizer tray. Arrange them on a dark platter with a little space between each egg so the olive pupils remain clearly visible.
Pair them with a crunchy vegetable platter and a savory dip. Carrots, celery, cucumber, and bell pepper provide freshness that balances the creamy filling.
They also work well alongside other handheld party snacks, such as stuffed mushrooms, baked potato bites, or a simple cheese and cracker board. Keep the accompanying dishes relatively tidy so guests can easily serve themselves.
Can I use only rice crackers?
Yes. Rice crackers eliminate the need to cut and toast bread, making the preparation faster. Choose small, flat crackers that are wide enough to cover the filled cavity. Avoid heavily curved or fragile crackers because they may not support the eggs securely.

How do I keep the olive pupils in place?
The small piece of trimmed egg white acts as a platform beneath each olive slice. Cut a shallow opening rather than a deep hole, return half of the removed piece, and press the olive down gently. The support should hold it level without splitting the surrounding white.
Keeping Leftovers Fresh
Keep the finished eggs refrigerated until serving. Because they contain cooked eggs and mayonnaise, do not leave them at room temperature for longer than two hours. When the room is especially warm, return them to the refrigerator sooner.
For the cleanest appearance and crispest bases, assemble the eggs shortly before the party. Toasted bread and rice crackers gradually absorb moisture from the filling, so fully assembled eggs are best enjoyed the same day.
Store leftovers in a shallow airtight container in the refrigerator for up to two days. Arrange them in a single layer to prevent the olive tops from being disturbed. If possible, remove any softened bread or cracker bases before storing and replace them with fresh ones before serving again.
Freezing is not recommended. Cooked egg whites can become rubbery and watery after thawing, while the mayonnaise-based filling may separate. These deviled eggs should also be served chilled or slightly cool rather than reheated.
Eyeball Deviled Eggs
Ingredients
- 1 tablespoon spicy brown mustard
- 12 pimento-filled cocktail olives
- 3 drops red food coloring or an equal amount of beet juice
- 3 slices soft white sandwich bread or 12 rice crackers
- 2 tablespoons mayonnaise
- Salt and freshly ground pepper adjusted to taste
- 6 large eggs
Instructions
- Arrange the eggs in a saucepan and add enough cool water to cover them completely. Bring the water to a boil, then cook the eggs for 20 minutes.
- Transfer the cooked eggs to a bowl of cold water and allow them to rest for 2–5 minutes to halt the cooking process. Once sufficiently cooled, carefully remove the shells.
- Cut each peeled egg lengthwise into two equal halves. Gently lift out the yolks, keeping the egg whites intact.
- Press the yolks through a fine-mesh strainer into a mixing bowl to create a smooth, finely textured base.
- Add the mayonnaise, spicy brown mustard, salt, and pepper. Blend thoroughly until the mixture reaches a dense, hummus-like consistency.
- Stir in the red food coloring or beet juice until the filling is evenly tinted. Cover the mixture or place it in a pastry bag so it does not dry out while the remaining components are prepared.
- When using sandwich bread rather than rice crackers, preheat the oven to 350°F (175°C).
- Cut 12 small rounds from the three bread slices with a round cookie cutter. Flatten each circle into a thin wafer, arrange them on a baking sheet, and toast for 5–7 minutes, or until crisp.
- Omit this step when using rice crackers.
- Using the end of a pastry tip, cut a small opening in the rounded top of every egg-white half. Remove each cut-out portion and divide it into two pieces.
- Return one half of each trimmed piece to its opening, forming a small support for the olive.
- Cut the cocktail olives crosswise into slices approximately ½ inch thick. Carefully press one olive slice into the top of each egg-white half, positioning it over the inserted piece.
- Turn each olive-topped egg-white half upside down. Pipe or carefully spoon the prepared yolk mixture into the cavity, avoiding excessive filling that could spill from the sides.
- Place one toasted bread round or rice cracker directly over the filling to form a base. Gently turn the assembled egg upright so the olive resembles the pupil of an eye.
- Continue the same process until all 12 egg halves have been completed.