
Soft, fluffy, and reliable, Dinner Rolls are a practical homemade bread for family dinners, holidays, and Sunday meals. They bake with golden tops, tender pull-apart centers, and a simple yeast dough that is kneaded right in the mixing bowl.
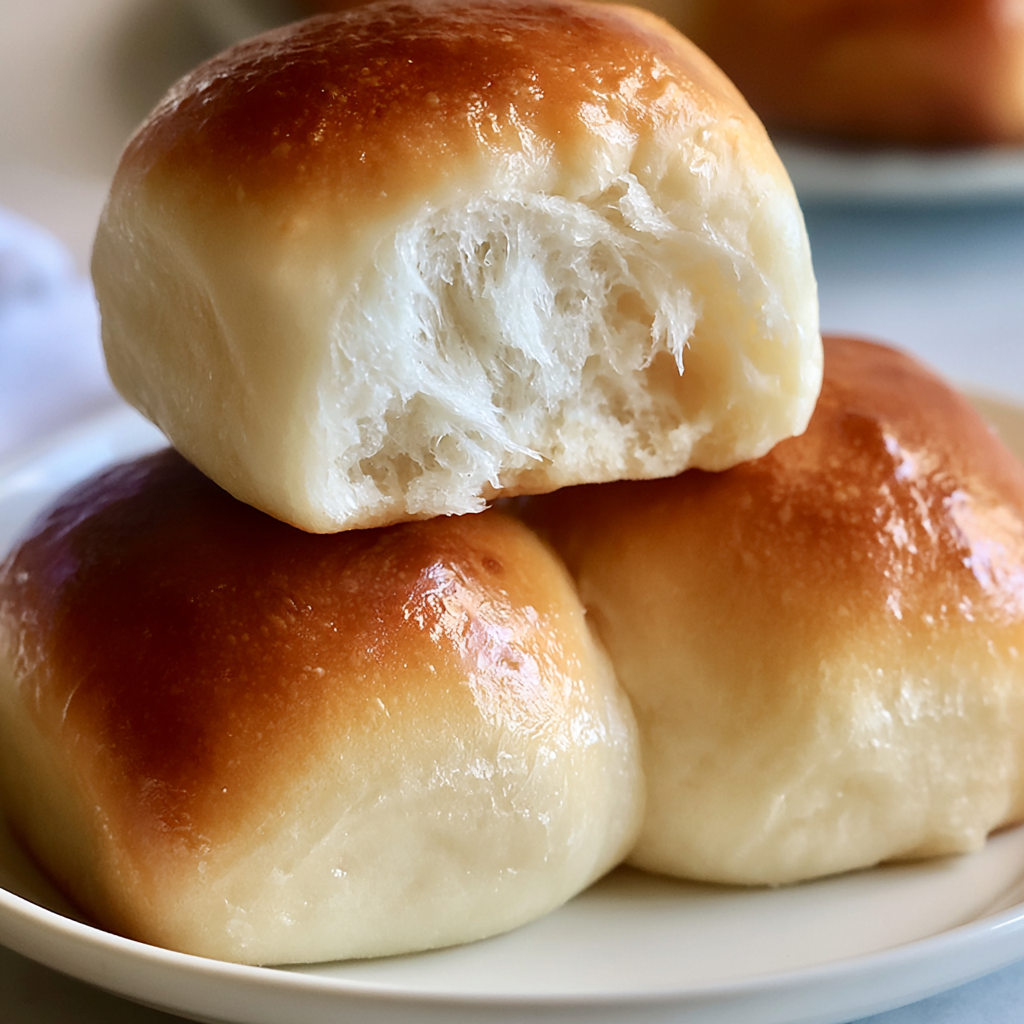
Homemade rolls can seem like a project, but this method keeps the process comfortably manageable. There is no complicated shaping or special equipment required. Once the yeast is active, the dough comes together with everyday baking ingredients and needs only a few minutes of kneading before you shape it.
The warm-oven proofing method is especially useful when your kitchen is cool. It gives the shaped dough a cozy place to rise, helping the rolls become noticeably puffy before baking. Arrange all 15 rolls together in one pan, and they bake into soft, connected rolls that are perfect for pulling apart at the table.
A little melted butter brushed over the tops is optional, but it gives the freshly baked rolls extra richness and a soft, glossy finish. Serve them warm when the interior is at its lightest and most tender.
Dinner Rolls Ingredients
All-purpose flour: Provides the structure for the dough while keeping the finished rolls tender rather than overly chewy.
Warm water: Hydrates the flour and creates the warm environment needed to activate the yeast. Aim for about 110°F rather than very hot water.
Active dry yeast: Gives the dough its rise and creates the airy texture inside each roll.
Granulated sugar: Adds mild sweetness while also helping the yeast become active during the first stage of mixing.
Large egg: Enriches the dough and contributes to the rolls’ soft, tender crumb. A room-temperature egg mixes into the dough more smoothly.
Vegetable oil: Adds moisture and richness while helping the rolls stay pleasantly soft. Another neutral-flavored oil, such as canola, can also be used.
Salt: Balances the slightly sweet dough and keeps the finished bread from tasting flat.
Melted butter: An optional finishing ingredient for brushing over the hot rolls after baking.

How to Make This Dinner Rolls
STEP 1: Add the warm water to a large mixing bowl, then stir in the sugar and active dry yeast. Let the mixture stand for about 2 to 5 minutes. Before moving on, look for a foamy layer on the surface. That foam is a useful sign that the yeast is active.
STEP 2: Grease a 9 × 13-inch baking pan well, coating both the base and sides. Once the yeast is foamy, mix in the oil, salt, and room-temperature egg until the liquid ingredients are combined.
STEP 3: Gradually stir the flour into the yeast mixture rather than adding it all at once. As more flour is incorporated, the mixture will change from a thick batter into a shaggy dough. Continue mixing until there are no obvious pockets of dry flour.
STEP 4: Knead the dough directly in the bowl for about 4 minutes. The finished dough should feel soft and slightly tacky, but it should still be manageable. Avoid adding unnecessary extra flour simply to make the dough completely dry, since a softer dough helps produce tender rolls.
STEP 5: Lightly oil your hands and divide the dough into 15 portions. Shape each portion into a smooth ball by gently stretching the outside of the dough and tucking the edges underneath. Place the rolls seam-side down in the prepared pan in three rows of five, leaving a little space between them.
STEP 6: Cover the pan loosely. Heat the oven to 375°F, switch it off once it reaches temperature, and place the covered pan inside the warm oven. Let the rolls rise for about 30 to 45 minutes. They should become puffy, expand toward one another, and nearly double in volume.
STEP 7: Remove the risen rolls from the oven and uncover them. Reheat the oven to 375°F, then bake for approximately 18 to 20 minutes. Look for richly golden tops and lightly browned edges where the rolls touch. Let them rest in the pan for 2 to 3 minutes before brushing with melted butter, if desired, and serving warm.
Serving Ideas for Dinner Rolls
These soft rolls fit naturally into meals where you want a warm bread for soaking up sauces, gravy, or flavorful juices.
Serve them alongside a classic roast chicken or turkey dinner with mashed potatoes and gravy. Their mildly sweet flavor also works especially well with savory holiday dishes.
They are equally useful with hearty soups and stews. Split a warm roll and use it to scoop up beef stew, chicken soup, or a creamy vegetable soup.
For a simple family meal, pair the rolls with baked chicken, roasted vegetables, or a comforting casserole. Leftover rolls can also be split and used for small sandwiches.
Why didn’t my rolls rise?
The most common issue is inactive yeast or water that was either too cool or too hot. After mixing the yeast with warm water and sugar, you should see noticeable foam within several minutes. If nothing happens, it is better to start again with fresh yeast before adding the remaining ingredients.
How do I know when the dough has risen enough?
The rolls should look clearly larger and puffier than when they first went into the pan. They will usually be close to doubled in size and should fill much of the space between each dough ball. The 30-to-45-minute range is a guide, so judge the dough by its appearance as well as the clock.
Can I knead the dough without a stand mixer?
Yes. This dough is designed to be kneaded directly in the mixing bowl, so no mixer is necessary. Work it by hand for roughly 4 minutes, folding and pressing until it becomes smoother and more elastic. Lightly oiling your hands can make soft dough easier to handle.
Why are my homemade rolls dense?
Dense rolls can result from yeast that did not activate properly, adding too much flour, or not allowing enough proofing time. Keep the dough soft and slightly tacky instead of making it stiff. Most importantly, give the shaped rolls enough time to become visibly puffy before baking.

Can I freeze these rolls?
Yes. Let the baked rolls cool completely before freezing so trapped steam does not create excess moisture. Wrap them well and place them in a freezer-safe container or bag. For the nicest texture, use them within about two months and warm them gently after thawing.
How to Store & Reheat
These rolls are at their softest shortly after baking, especially during the first hour, but leftovers can still be kept successfully.
Once completely cool, place the rolls in an airtight container or tightly sealed bag. They can be kept at room temperature for about 2 days. Refrigeration can make bread firm more quickly, but refrigerated rolls will generally keep for about 3 to 4 days when sealed well.
For longer storage, freeze completely cooled rolls in an airtight freezer bag or container for up to 2 months. Separating layers with parchment paper can make it easier to remove only the number you need. Thaw frozen rolls at room temperature before reheating.
To restore some of their fresh-baked softness, warm the rolls in a 300°F to 325°F oven for several minutes until heated through. Covering them loosely with foil can help prevent the tops from becoming too crisp. Individual rolls can also be reheated briefly in the microwave, though they are best eaten immediately afterward.
If you want a richer finish, brush reheated rolls lightly with melted butter just before serving.
Helpful Tips
- Check the water temperature carefully. Warm water around 110°F encourages active dry yeast to wake up without exposing it to excessive heat that could prevent a proper rise.
- Keep the dough soft. A slightly tacky dough is normal. Adding large amounts of extra flour can make the finished rolls heavier and less tender.
- Watch the rolls during proofing. Kitchen temperature affects rising time, so use the 30-to-45-minute window as a guideline and wait until the rolls are visibly expanded and puffy before baking.
Dinner Rolls
Ingredients
- 3 3/4 cups plain all-purpose flour
- 1/4 cup granulated sugar
- 1 large egg brought to room temperature
- 1 teaspoon salt
- 1 1/4 cups warm water approximately 110°F
- 1/3 cup vegetable oil or another mild-flavored neutral oil such as canola
- 2 tablespoons active dry yeast
- Additional vegetable oil or cooking spray for greasing the pan and hands
- Melted butter optional, for brushing the baked rolls
Instructions
- Pour the warm water into a large mixing bowl and stir in the sugar and active dry yeast. The water should be approximately 110°F. Allow the mixture to stand for 2–5 minutes, or until a noticeable layer of foam develops and the yeast becomes fragrant.
- While the yeast activates, thoroughly grease the bottom and sides of a 9 × 13-inch baking pan with oil or butter to prevent the rolls from adhering during baking.
- Add the vegetable oil, salt, and room-temperature egg to the foamy yeast mixture. Stir until the wet ingredients are generally combined.
- Gradually work the all-purpose flour into the liquid mixture, stirring after each addition. Continue until all the flour has been absorbed and a rough, shaggy dough develops.
- Knead directly in the mixing bowl for approximately 4 minutes. Continue working the dough until it becomes smooth, soft, and slightly tacky without being excessively sticky.
- Lightly coat your hands with vegetable oil or cooking spray. Divide the prepared dough into 15 evenly sized portions, then roll each piece between your palms to form a smooth, firmly shaped ball.
- Position the dough balls seam-side down in the prepared 9 × 13-inch pan, arranging them in three rows of five. Leave approximately 1/2 inch of space between the rolls to provide room for expansion.
- Loosely cover the pan with plastic wrap or a damp kitchen towel. Preheat the oven to 375°F. Once it reaches the proper temperature, switch the oven off.
- Place the covered pan inside the warm, turned-off oven. Let the dough proof for 30–45 minutes, until the rolls appear noticeably puffy and have nearly doubled in volume. They should feel soft and should have expanded to occupy most of the pan.
- Remove the risen rolls from the oven, then preheat the oven once again to 375°F.
- Return the pan to the fully preheated oven and bake the rolls for 18–20 minutes. They are ready when the tops are richly golden, the upper surfaces feel set, and the sides where the rolls meet are lightly golden. If the oven tends to bake hot, begin checking them at the 18-minute mark.
- Remove the baked rolls from the oven and leave them in the pan for 2–3 minutes. If desired, generously brush the warm tops with melted butter for additional richness and a glossy finish. Serve while still warm.