
These christmas cookies with walnut filling combine a tender brown sugar cookie with a rich, nutty center for a festive treat that feels special without requiring complicated decorating. The creamy walnut filling stays tucked inside each cookie while the edges bake to a delicate golden brown.
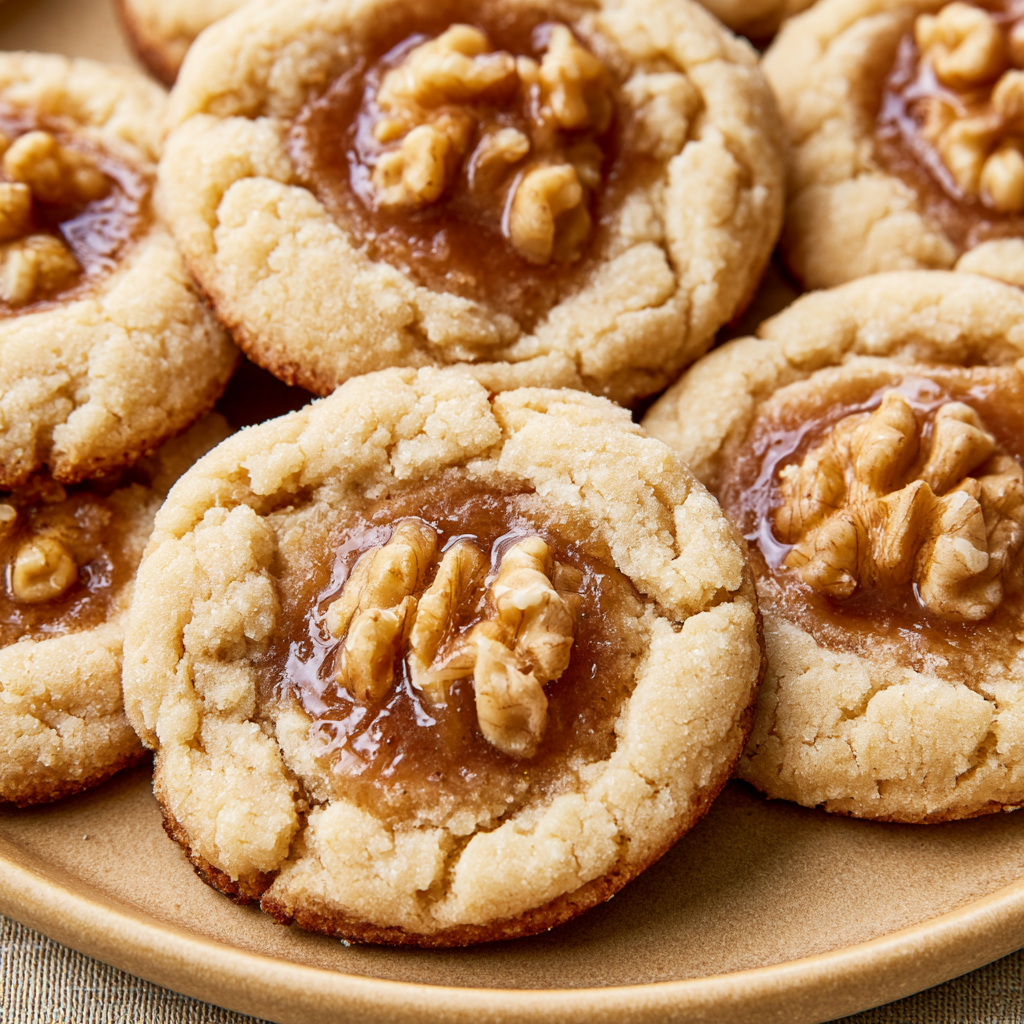
These cookies are a great choice when you want something a little different from frosted sugar cookies or cutout cookies during the holidays. The dough is soft and buttery, while dark brown sugar gives it a deeper sweetness that pairs naturally with walnuts and vanilla.
The thumbprint-style shape also makes the cookies simple to portion and fill. There is no rolling pin, cookie cutter, or icing involved. You shape the dough, make a small indentation, spoon in the filling, and bake.
What really makes them memorable is the contrast between the tender cookie and the slightly textured walnut center. Sour cream helps bind the filling together while keeping it pleasantly soft instead of dry or crumbly.
Christmas Cookies With Walnut Filling Ingredients
You only need a straightforward cookie dough and a three-ingredient walnut filling to make these holiday cookies.
All-purpose flour: Gives the cookies enough structure to hold the indentation and walnut center while baking.
Butter: Softened butter creates a tender texture and blends smoothly with the brown sugar.
Dark brown sugar: Used in both the cookie dough and filling for sweetness, moisture, and a deeper caramel-like flavor.
Egg: Helps bind the dough and gives the cookies structure.
Vanilla extract: Adds a warm background flavor that complements both brown sugar and walnuts.
Baking soda: Provides a small amount of lift so the cookies stay tender rather than overly dense.
Salt: Balances the sweetness and brings out the nutty flavor of the filling.
Walnuts: Freshly chopped walnuts provide the characteristic nutty taste and a little texture in every bite.
Sour cream: Moistens and binds the walnut mixture so it can be neatly spooned into the cookies.

Cooking Steps
STEP 1: Heat your oven to 350°F (175°C). Line a baking sheet with parchment paper or a reusable baking mat so the cookies release cleanly after baking.
STEP 2: Beat the softened butter and dark brown sugar together in a large mixing bowl. Continue mixing until the butter is evenly incorporated and the mixture looks creamy rather than streaky or crumbly.
STEP 3: Add the egg and vanilla. Mix again until the wet ingredients are smooth and thoroughly combined.
STEP 4: In another bowl, combine the flour, baking soda, and salt. Gradually add these dry ingredients to the butter mixture. Mix only until an even cookie dough forms and no obvious pockets of flour remain.
STEP 5: Make the walnut center by combining the chopped walnuts with the additional dark brown sugar and sour cream. Stir until the walnuts are evenly coated and the filling holds together when spooned.
STEP 6: Scoop portions of dough about 1 1/2 inches wide onto the prepared baking sheet. Leave a little room between them for spreading. Gently press your thumb into the center of each piece of dough to form a hollow without pressing all the way through.
STEP 7: Place a generous teaspoon of walnut filling into each indentation. Keep most of the filling centered rather than spreading it across the cookie surface.
STEP 8: Bake for 11–12 minutes. The cookies are ready when the edges are just beginning to turn light brown. Let them cool on the baking sheet for about 5 minutes before carefully transferring them to a wire rack to cool completely.
Keeping Leftovers Fresh
Let the cookies cool completely before placing them in a storage container. Trapping warmth inside the container can create condensation and soften the cookies more than intended.
Store the cooled cookies in an airtight container at room temperature for about 3–4 days. If you stack them, place parchment paper between the layers so the walnut centers do not stick to neighboring cookies.
For longer storage, refrigerate them in a tightly sealed container for approximately one week. Bring refrigerated cookies to room temperature before serving if you prefer a softer texture and fuller walnut flavor.
These cookies can also be frozen. Arrange completely cooled cookies in a freezer-safe container with parchment between layers and freeze for up to 2–3 months. Thaw them at room temperature while still loosely covered.
Reheating is generally unnecessary. If you enjoy cookies slightly warm, heat one briefly at a low temperature or for just a few seconds in the microwave. Avoid overheating because the filling can become very hot before the cookie itself feels warm.
Why does the walnut filling use sour cream?
Sour cream adds enough moisture to bring the chopped walnuts and brown sugar together into a spoonable filling. It also keeps the center from becoming excessively dry during baking. You should end up with a cohesive mixture that stays comfortably inside the indentation.
How do I keep the filling from falling out?
Make a deep enough indentation to hold the filling, but do not press completely through the dough. Add the walnut mixture primarily to the center and avoid overfilling. A generous teaspoon is enough to create a noticeable walnut layer without overwhelming the cookie.
How do I know when these cookies are done?
Watch the edges rather than waiting for the entire cookie to become brown. After about 11–12 minutes, the outer edges should be just lightly golden while the centers remain softer. The cookies will continue setting as they rest on the hot baking sheet.
Can I prepare the cookie dough ahead of time?
Yes. You can prepare the dough ahead and keep it well covered in the refrigerator until you are ready to shape and bake the cookies. If the chilled dough becomes very firm, let it sit briefly at room temperature so it is easier to scoop and indent without cracking.
Can I freeze Christmas cookies with walnut filling?
Yes. Freeze them only after they have baked and cooled completely. Use a freezer-safe container and separate layers with parchment paper. Thaw the cookies at room temperature before serving so the cookie and walnut center can regain their softer texture.

Serving Ideas for Christmas Cookies With Walnut Filling
These brown sugar walnut cookies work especially well as part of a mixed Christmas cookie platter because their filled centers make them visually different from plain drop cookies.
Serve them alongside a glass of cold milk for a simple dessert, or pair them with hot coffee for an afternoon holiday treat. Their brown sugar and walnut flavor also works naturally with black tea, chai-style tea, or another warm beverage.
For holiday gatherings, arrange them with a few contrasting cookies such as powdered sugar cookies, butter cookies, or chocolate cookies. The walnut centers give the tray some texture without needing additional frosting or decoration.
Helpful Tips
- Chop the walnuts fairly finely. Smaller pieces blend more evenly with the brown sugar and sour cream and are easier to spoon into the cookie indentations.
- Do not overbake. Remove the cookies once the edges begin to develop a light golden color. Waiting until the entire cookie looks browned can make them firmer after cooling.
- Shape the indentation carefully. Press deeply enough to create room for the filling while leaving dough underneath so the walnut mixture does not leak through the bottom.
These Christmas cookies are especially convenient when you want a holiday bake that looks festive without relying on elaborate decorating. Brown sugar keeps the cookie base flavorful and tender, while the walnut filling adds enough richness and texture to make each one feel more substantial than a standard thumbprint cookie.
Because the same dark brown sugar appears in both the dough and filling, the two components taste naturally connected rather than like separate layers. The walnut mixture provides the main contrast, adding a nutty bite against the softer cookie.
Bake them for a Christmas cookie exchange, add them to a dessert tray, or keep a batch at home for serving with coffee throughout the holiday season. Once cooled and stored properly, they are an inviting make-ahead cookie that is simple enough for everyday holiday baking but distinctive enough for a festive spread.
Christmas Cookies with Walnut Filling
Ingredients
For the cookies:
- 2 cups plain all-purpose flour
- 1 large egg
- 1/2 teaspoon baking soda
- 1 cup firmly packed dark brown sugar
- 1 teaspoon vanilla extract Nielsen-Massey vanilla extract may be used
- 1/4 teaspoon fine salt
- 1/2 cup butter softened to room temperature
For the walnut filling:
- 1/4 cup sour cream
- 1 cup walnuts freshly chopped for the best texture
- 1/2 cup dark brown sugar
Instructions
- Preheat the oven to 350°F (175°C). In a large mixing bowl, beat the softened butter with the dark brown sugar until the mixture is creamy, smooth, and thoroughly blended.
- Add the egg and vanilla extract to the creamed butter mixture. Mix until both ingredients are completely incorporated.
- In a separate bowl, sift together the all-purpose flour, baking soda, and salt. Gradually work this dry mixture into the butter mixture, stirring until an evenly combined cookie dough forms.
- Prepare the filling in another bowl by mixing the chopped walnuts, 1/2 cup dark brown sugar, and sour cream. Stir thoroughly until the ingredients come together into a uniform, cohesive mixture.
- Line a baking sheet with parchment paper or a Silpat baking mat. Using a 1 1/2-inch cookie scoop, portion the dough onto the prepared baking sheet.
- Press your thumb gently into the center of each portion of dough to create an indentation. Spoon a generous teaspoonful of walnut filling into each hollow.
- Bake in the preheated oven for 11–12 minutes, removing the cookies when the edges are just beginning to develop a light brown color.
- Allow the freshly baked cookies to remain on the baking sheet for about 5 minutes. Transfer them carefully to a wire cooling rack and leave them there until completely cooled.
- Once fully cooled, serve the cookies with milk or a preferred hot beverage. Keep any remaining cookies in an airtight container to help maintain their freshness.