
Focaccia Genovese is a tender, golden Ligurian bread with an airy interior, crisp edges, and deep dimples filled with salty olive oil brine. It is dependable enough for home bakers, flavorful enough to serve on its own, and ideal for sandwiches, appetizers, or the bread basket.
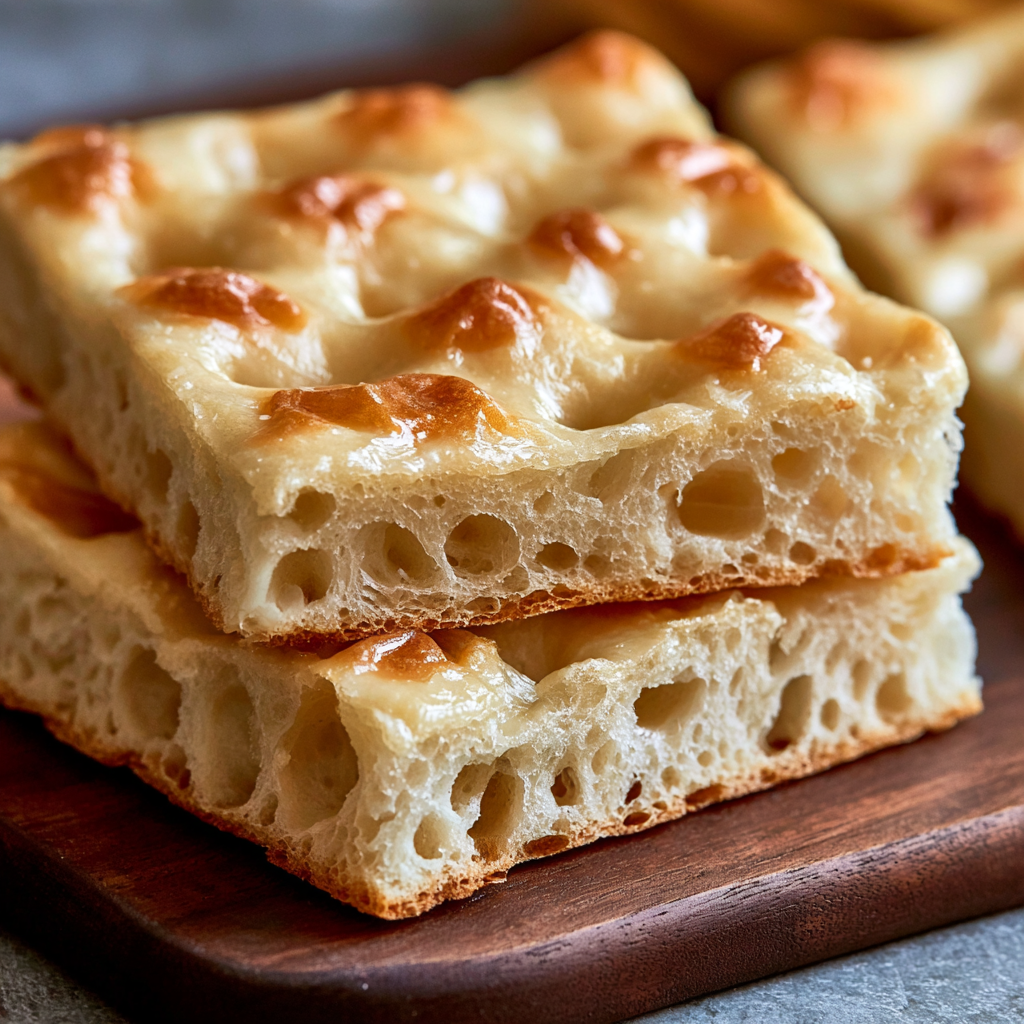
There is something especially satisfying about pulling a tray of freshly baked focaccia from your oven. The surface is lightly crisp and glossy, while the center stays soft, supple, and pleasantly chewy.
What makes this version distinctive is the combination of strong flour, olive oil, malt, and a small amount of lard. Together, they help the dough develop elasticity, color, and the delicate richness associated with traditional Ligurian focaccia.
The method requires several resting periods, but the actual hands-on work is manageable. Each rest has a purpose, allowing the gluten to relax, the yeast to create air, and the dough to spread naturally without being forced.
Focaccia Genovese Recipe Ingredients
High-protein bread flour: Strong bread flour or Tipo 00 flour with a high strength rating gives the focaccia enough structure to trap air while maintaining a tender crumb.
Active dry yeast: Provides the fermentation needed for a light, well-risen interior. Distributing it evenly through the flour helps the dough rise consistently.
Water: Hydrates the flour and creates the soft dough needed for an open, airy texture.
Dry or liquid malt: Supports fermentation and encourages a deeply golden surface. Liquid malt can be mixed with the water when dry malt is unavailable.
Extra-virgin olive oil: Enriches the dough, coats the baking trays, and forms the glossy finish that collects inside the dimples.
Lard: Adds suppleness and traditional savory richness. A good-quality plain lard works well when specialty Italian lard is unavailable.
Fine salt: Seasons both the dough and the finishing brine. Adding the dough salt near the end of mixing keeps it from slowing the yeast too early.

Step-by-Step Focaccia Genovese
STEP 1: Combine the strong flour, active dry yeast, and dry malt in a large bowl or stand mixer bowl. Gradually add the water while mixing until the ingredients begin forming a cohesive dough. When using liquid malt, dissolve or mix it with the water before adding it.
STEP 2: Work the olive oil into the partially formed dough until it is absorbed. Add the lard and continue mixing until no visible pieces remain. Incorporate the fine salt last, then mix until the dough looks uniform and the salt has fully dispersed.
STEP 3: Switch to a dough hook and knead on low speed for about 10 minutes. For hand kneading, work the dough on a lightly floured surface for approximately 15 minutes. It should become smooth, elastic, and soft without feeling loose or shapeless.
STEP 4: Cover the dough and let it rest for 10 minutes. Knead it again for about 3 minutes, then perform a gentle stretch and fold. Shape it into a firm ball, cover it with a bowl or clean towel, and leave it on the work surface for 30 minutes.
STEP 5: Divide the dough into two equal portions of approximately 500 grams each. Shape each portion into a compact piece, pinch the seams closed, and position the seam underneath. Cover both pieces and rest them for another 30 minutes.
STEP 6: Lightly flour the work surface and roll each portion until it is close to the size of its baking tray. Coat the trays with part of the measured olive oil, transfer the dough, and gently adjust it toward the edges. Dust the tops lightly with flour, cover, and rest for 30 minutes before leaving them to proof for another hour.
STEP 7: Dissolve the finishing salt in slightly less than half a cup of water. Uncover the risen dough and press your fingertips deeply into the surface, forming evenly spaced dimples while carefully stretching the dough toward the corners. Pierce only unusually large bubbles so the surface stays relatively even.
STEP 8: Divide the remaining olive oil and salt brine between the two trays. Spread the liquids over the surface with your hands, making sure they settle into the indentations. Leave the focaccias uncovered for their final 45-minute proof. Bake in a conventional oven at 450°F for about 15 minutes, then cool briefly before slicing.
Helpful Tips
- Press straight down with your fingertips rather than dragging them across the surface. Deep impressions hold more brine and create the characteristic dimpled appearance.
- Give the dough every scheduled rest. Trying to roll or stretch it too quickly can cause it to spring back and may produce a tighter crumb.
- Watch the bread closely near the end of baking. The surface should be golden and lightly crisp, but extending the baking time too far can dry the interior.
Perfect Pairings
Serve warm slices alongside minestrone, tomato soup, or another simple vegetable soup. The airy bread is sturdy enough for dipping, while the salty olive oil surface adds flavor without needing extra butter.
For an appetizer spread, pair it with marinated olives, roasted vegetables, soft cheese, or cured meats. Cut the focaccia into small squares so guests can easily pick up individual portions.
It also works beautifully as sandwich bread. Split a larger square horizontally and fill it with mozzarella, tomatoes, grilled vegetables, or thinly sliced meats. The tender center holds fillings well, while the baked surface keeps the sandwich from feeling too soft.
Why does the dough need several resting periods?
Each rest allows the gluten to relax and the yeast to continue fermenting. Relaxed dough is easier to roll and stretch without tearing or shrinking. The extended fermentation also develops the light internal structure and more complex flavor expected from traditional focaccia.
Can I make the dough without a stand mixer?
Yes. Mix the ingredients in a sturdy bowl, then knead the dough by hand on a lightly floured surface for about 15 minutes. Use a push, fold, and turn motion until the dough becomes smooth, elastic, and evenly hydrated.
What can replace the lard?
A good-quality plain lard is the closest practical substitute for specialty Italian lard. It preserves the supple texture and savory flavor of the original method. Replacing it entirely with olive oil will change the dough slightly, although the bread can still bake successfully.
Why is brine poured over the focaccia?
The mixture of water and salt seasons the surface and gathers inside the deep dimples. During baking, it combines with the olive oil to create moist, flavorful pockets and the distinctive lightly crisp, salty top associated with Ligurian focaccia.
Can toppings be added before baking?
Thinly sliced onions or olives may be added after the final proof and just before the trays enter the oven. Keep toppings relatively light so they do not weigh down the risen dough or prevent the surface from baking evenly.

Keeping Leftovers Fresh
Let the focaccia cool before storing it so trapped steam does not make the crust damp. Place leftover pieces in an airtight container or tightly sealed bag and keep them at room temperature for up to two days. Refrigeration can extend storage slightly, but it may make the bread firm more quickly.
For longer storage, wrap individual portions securely and freeze them for up to two months. Separating the pieces before freezing makes it easier to reheat only the amount you need.
Reheat room-temperature or refrigerated focaccia in a 350°F oven for approximately 5 to 8 minutes. Frozen portions can be thawed first or warmed directly from frozen with a few additional minutes. Oven reheating restores the lightly crisp surface more effectively than a microwave.
For a richer finish, brush the warm focaccia with a small amount of extra-virgin olive oil immediately after reheating. Serve it while the exterior is crisp and the center is soft.
Focaccia Genovese
Ingredients
For the Dough
- 12 ounces water
- ½ ounce dry malt or 1 ounce liquid malt
- 2 teaspoons fine salt
- 2 tablespoons extra-virgin olive oil
- 19 ounces high-protein bread flour or strong Tipo 00 flour preferably W 320
- 1 ounce lard ideally Lardo di Colonnata di Cinta Senese
- 2 teaspoons active dry yeast
For the Brine and Finish
- 2 ounces extra-virgin olive oil divided between the baking trays
- 1 teaspoon fine salt
- Slightly less than ½ cup water
Instructions
- Place the flour, active dry yeast, and dry malt in a large mixing bowl or the bowl of a stand mixer. If using liquid malt, reserve it to add with the water. Stir thoroughly so the yeast and malt are distributed evenly throughout the flour.
- Gradually pour in the 12 ounces of water while mixing by hand or with the paddle attachment of a stand mixer. Add the liquid malt at this stage when substituting it for dry malt.
- Continue mixing until a cohesive dough begins to form. Add the extra-virgin olive oil and work it into the dough until fully incorporated.
- Add the lard and mix until it is completely absorbed and no visible pieces remain.
- Lastly, incorporate the fine salt. Continue mixing until the salt has dissolved into the dough. Adding the salt at the end prevents it from interfering with the initial activity of the yeast.
- Knead the dough until it becomes smooth, soft, and elastic. With a stand mixer, change to the dough hook and knead on low speed, approximately setting 2, for about 10 minutes.
- When kneading by hand, transfer the dough to a lightly floured surface and work it for approximately 15 minutes, or until supple and uniform.
- Cover the dough and leave it undisturbed for 10 minutes to allow the gluten to relax.
- Knead it again for approximately 3 minutes, forming a smoother and more even ball. Finish with a gentle stretch and fold to strengthen the dough structure.
- Gently stretch the dough, fold it over itself, and shape it into a firm, rounded ball.
- Cover it with an inverted bowl or a clean kitchen towel and let it rest on the work surface for 30 minutes.
- Divide the dough into two equal portions, each weighing approximately 500 grams. Lightly stretch each portion, roll it into shape, and pinch the seam closed.
- Position the dough pieces seam-side down, cover them, and allow them to rest for another 30 minutes.
- Dust the work surface and dough lightly with flour. Using a rolling pin, carefully extend each portion until it is close to the dimensions of its baking tray.
- Coat the trays lightly with some of the measured olive oil. Transfer the dough to the prepared trays and gently adjust each piece so it fits the pan.
- Apply a light dusting of flour to the surface, cover the trays, and rest the dough for 30 minutes. This resting period allows the gluten to relax before the final shaping.
- Keep the dough covered in the trays and allow it to proof for an additional 1 hour.
- While it proofs, dissolve 1 teaspoon of fine salt in slightly less than ½ cup of water to prepare the brine.
- Remove the coverings. Press firmly into the dough with your fingertips to create deep, evenly spaced indentations, gently stretching the dough outward as you work.
- Carefully pierce any unusually large air pockets with a toothpick or thin cake tester.
- Pour the 2 ounces of extra-virgin olive oil over the dough, dividing it equally between the two trays. Pour half of the prepared brine onto each focaccia.
- Use your hands to spread the oil and salted water evenly across the entire surface, ensuring that the liquid settles into the deep dimples.
- Leave the trays uncovered and allow the dough to complete its final proof for 45 minutes.
- Preheat a conventional, non-fan oven to 450°F (230°C).
- Add thinly sliced onions, olives, or other desired toppings before baking, when using them.
- Place the trays in the lower third of the oven. Alternatively, position them directly on a preheated pizza stone.
- Bake for 15 minutes, taking care not to exceed the stated baking time.
- Remove the focaccia from the oven and let it cool briefly before slicing and serving.