
This Dark Chocolate Pumpkin Tart pairs a deep cocoa crust with smooth, warmly spiced pumpkin filling for a rich fall dessert that slices beautifully and can be prepared ahead for holidays or special dinners.
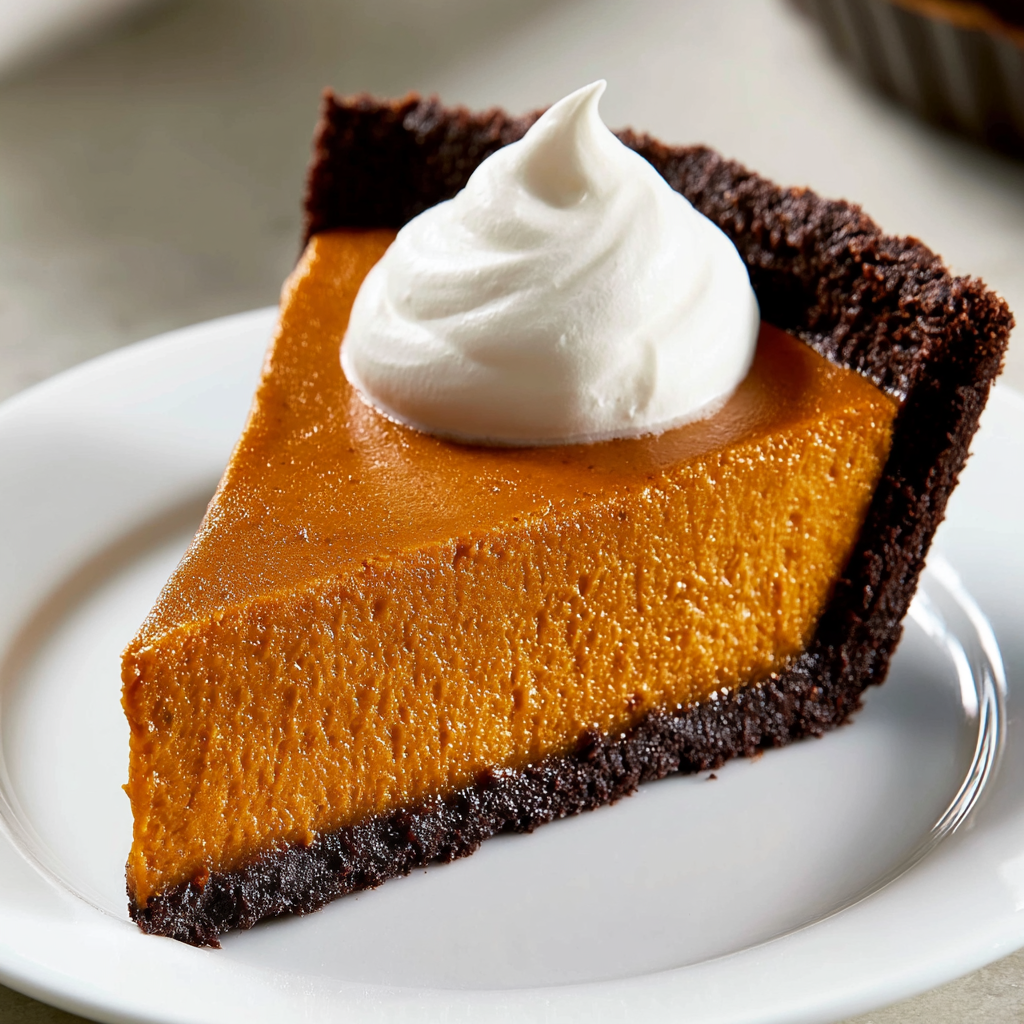
If you love pumpkin desserts but want something a little different from a traditional pie, this tart is a great choice. The dark cocoa crust brings just enough chocolate intensity to balance the creamy sweetness of pumpkin and condensed milk.
The method is also pleasantly straightforward. You press the chocolate dough directly into the tart pan instead of rolling pastry, give it a short prebake, then pour in the simple whisked pumpkin filling. Baking first at a higher temperature helps the tart begin setting before a gentler finish at 350°F.
Once cooled, the filling becomes smooth and sliceable while the cocoa crust provides a firm, crumbly contrast. Serve it as-is or add a spoonful of whipped cream when you want an extra-soft finish.
Dark Chocolate Pumpkin Tart Ingredients
All-purpose flour: Gives the chocolate tart shell enough structure to hold the pumpkin filling and release cleanly from the removable-bottom pan.
Dark unsweetened cocoa powder: Creates the deep chocolate flavor and dark color that make this crust stand apart from a standard pastry shell.
Granulated sugar: Sweetens the cocoa crust and helps balance the natural bitterness of dark cocoa.
Unsalted butter: Melted butter binds the crust ingredients together and makes it possible to press the dough directly into the pan.
Kosher salt: A small amount in both components keeps the tart from tasting overly sweet and sharpens the chocolate and pumpkin flavors.
Pure pumpkin: Forms the base of the filling and gives the finished tart its classic pumpkin color, flavor, and creamy body.
Sweetened condensed milk: Provides both sweetness and richness while helping create a smooth, custard-like filling.
Large egg: Helps the pumpkin mixture set during baking so the tart can be sliced neatly after cooling.
Pumpkin pie spice: Adds the warm fall spice profile that complements both pumpkin and dark chocolate.

Step-by-Step Dark Chocolate Pumpkin Tart
STEP 1: Heat your oven to 425°F and lightly coat a 9-inch round tart pan with a removable bottom using nonstick cooking spray. Placing the tart pan on a baking sheet later will make it easier to move and will catch any possible drips.
STEP 2: Make the cocoa crust by whisking the flour, dark cocoa powder, granulated sugar, and salt until evenly combined. Pour the melted butter into the center and stir until the mixture forms a crumbly, evenly moistened dough. Finish mixing with your hands if needed.
STEP 3: Transfer the chocolate mixture to the prepared pan. Press it firmly and evenly over the bottom before working it up the sides. Try to keep the thickness consistent so the crust bakes at the same rate throughout. Bake the shell for about 10 minutes at 425°F.
STEP 4: Remove the prebaked shell from the oven and leave it to cool for roughly 10 minutes. The crust may bubble slightly while baking, which is normal. While it rests, whisk together the pumpkin, sweetened condensed milk, egg, pumpkin pie spice, and remaining salt until completely smooth.
STEP 5: Pour the pumpkin filling carefully into the partially cooled chocolate shell, spreading it gently if necessary so the surface is level. Return the tart to the 425°F oven and bake for 10 minutes.
STEP 6: Lower the oven temperature to 350°F without removing the tart. Continue baking for approximately 25 to 30 minutes. Begin checking toward the lower end of the baking range, since ovens and tart pans can vary. The center should be set rather than loose or liquid.
STEP 7: Remove the tart from the oven when the filling is set and a toothpick tested near the center comes out clean. Leave the dessert in its pan for at least one hour before attempting to remove or slice it. Cooling is important because the pumpkin filling continues to firm as its temperature drops.
Serving Ideas for Dark Chocolate Pumpkin Tart
A simple spoonful of lightly whipped cream is especially good with this tart because its airy texture softens the intensity of the cocoa crust without covering up the pumpkin flavor.
For a holiday dessert spread, serve smaller wedges alongside coffee or tea. The combination of chocolate, pumpkin, and warm spice is rich enough that modest slices are usually satisfying.
You can also serve the tart well cooled rather than warm. Allowing plenty of resting time gives the pumpkin center a cleaner texture and makes the contrast between the smooth filling and cocoa crust more noticeable.
Can I make this tart ahead of time?
Yes. In fact, making it ahead can make serving easier because the pumpkin filling has plenty of time to set completely. Bake and cool the tart as directed, then refrigerate it once it has reached room temperature. Slice it when you are ready to serve.
How do I know when the pumpkin filling is done?
The center should look set rather than wet or fluid. A toothpick inserted into the middle should come out clean. Start checking a few minutes before the end of the suggested baking time so you do not continue baking after the filling has already set.
Why does the chocolate crust need to be prebaked?
The short prebake gives the cocoa crust a head start before the wet pumpkin mixture is added. This helps the base develop a firmer texture and reduces the chance that the finished shell will feel excessively soft beneath the creamy filling.

Can I use regular cocoa powder instead?
You can use another unsweetened cocoa powder if necessary, but the finished tart may have a different chocolate flavor and appearance. Dark cocoa is what gives this dessert its particularly deep color and stronger contrast with the sweet pumpkin filling.
Should pumpkin tart be served warm or cold?
Let it cool for at least an hour before cutting so the center has time to firm. It can then be enjoyed at room temperature or chilled. For especially neat slices, a fully cooled or refrigerated tart is usually the easiest to cut.
Helpful Tips
- Press the crust evenly. Pay particular attention to the corners where the bottom meets the sides. Very thick areas may stay softer while overly thin spots can bake too quickly.
- Watch the final baking time. Begin checking several minutes early rather than relying only on the clock. The shallow shape of a tart means the filling can set relatively quickly once it gets close to done.
- Allow enough cooling time. Cutting into warm pumpkin custard can result in soft, messy slices. A full hour of cooling is the minimum, and additional chilling can make serving even cleaner.
How to Store & Reheat
Once the tart has cooled completely, cover it securely and keep it refrigerated. Because the filling contains pumpkin, egg, and sweetened condensed milk, refrigeration is the most appropriate way to store leftovers. For the best texture and flavor, plan to enjoy refrigerated slices within about 3 to 4 days.
You can also freeze individual portions for longer storage. Cool the tart fully first, then wrap slices securely and place them in a freezer-safe container. Freeze for up to 1 to 2 months for the best quality. Thaw the portions overnight in the refrigerator before serving.
Reheating is usually unnecessary because this chocolate pumpkin tart is excellent chilled or at room temperature. If you prefer a less-cold slice, simply let it rest outside the refrigerator briefly before serving rather than heating it aggressively. This helps preserve the smooth pumpkin filling and keeps the chocolate crust from becoming overly soft.
Dark Chocolate Pumpkin Tart
Ingredients
For the Chocolate Crust
- ½ cup unsalted butter melted
- ½ teaspoon kosher salt
- ½ cup unsweetened dark cocoa powder
- 1 cup all-purpose flour
- ¾ cup granulated white sugar
For the Pumpkin Filling
- 1 large egg
- ¼ teaspoon kosher salt
- 1 can 14 ounces sweetened condensed milk
- 1 teaspoon pumpkin pie spice
- 1 can 15 ounces pure pumpkin
Instructions
- Heat the oven to 425°F. Lightly coat a 9-inch round tart pan with a removable bottom with nonstick cooking spray, then set it aside while preparing the crust.
- In a large mixing bowl, thoroughly whisk together the all-purpose flour, dark unsweetened cocoa powder, granulated sugar, and ½ teaspoon kosher salt.
- Create a hollow in the center of the dry mixture and add the melted unsalted butter. Stir until the ingredients come together into a crumbly dough, using your hands for the final mixing if necessary to distribute the butter evenly.
- Transfer the chocolate dough to the prepared tart pan. Press it into an even layer across the base and continue pressing it uniformly up the sides.
- Set the tart pan on a baking sheet to catch possible drips. Bake at 425°F for 10 minutes. Some bubbling in the crust during baking is normal.
- Remove the crust from the oven and allow it to cool for approximately 10 minutes while making the pumpkin mixture.
- In a clean mixing bowl, combine the pure pumpkin, sweetened condensed milk, egg, pumpkin pie spice, and ¼ teaspoon kosher salt.
- Whisk until the filling is completely blended and has a smooth, uniform consistency.
- Pour the prepared pumpkin mixture into the partially cooled chocolate crust.
- Bake the assembled tart at 425°F for 10 minutes. Reduce the oven temperature to 350°F and continue baking for another 25–30 minutes.
- The tart is ready when the pumpkin center is set and a toothpick inserted into the middle comes out clean.
- Leave the tart in its pan to cool for at least 1 hour before slicing. This resting period allows the pumpkin filling to finish setting and makes the tart easier to cut cleanly.