
Oreo Witch Hat Cookies are a quick Halloween treat made with chocolate sandwich cookies, melted chocolate, candy kisses, and colorful sprinkles. They’re simple to assemble, kid-friendly, and perfect for parties or Halloween dessert trays.
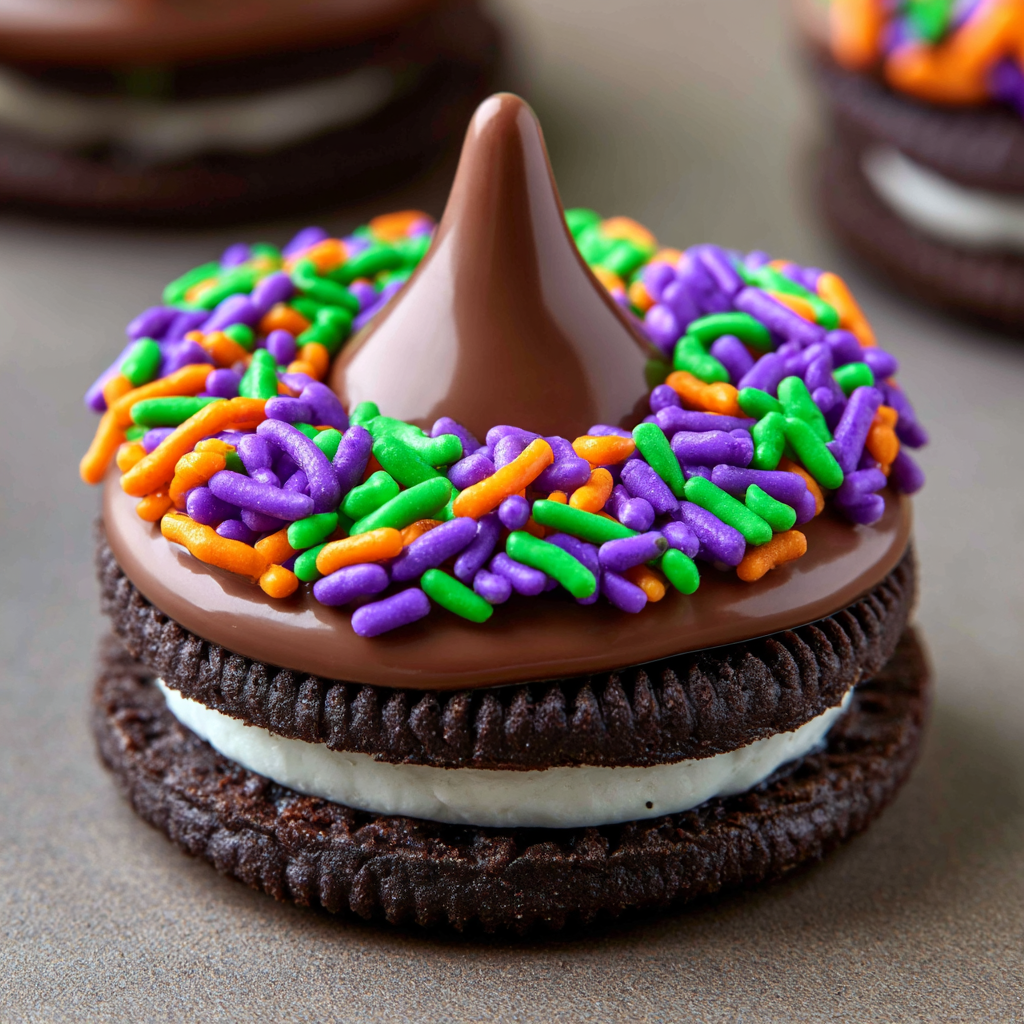
When you need a festive treat without turning on the oven, these little witch hats are an especially fun option. The round chocolate cookie creates the brim, while a chocolate candy kiss forms the pointed top, so the Halloween shape comes together with almost no decorating experience required.
The melted chocolate does more than add another rich chocolate layer. It acts as the glue that holds the candy in place and gives the sprinkles something to cling to. Once everything sets, you get a neat handheld cookie with a crisp bite, creamy chocolate coating, and plenty of playful Halloween color.
They’re also practical for busy October schedules. You can make a dozen at once, set them aside to firm up, and have a party-ready dessert without mixing dough, heating the oven, or working through complicated decorating steps.
Oreo Witch Hat Cookies Ingredients
You only need a handful of ingredients for these Halloween cookies, so setting everything out before you start makes assembly especially fast.
- Chocolate sandwich cookies: Double-stuffed cookies provide a sturdy, thick base that works well as the wide brim of each witch hat.
- Chocolate chips: Melted until smooth, these create the coating that secures the candy and sprinkles to the cookies.
- Chocolate candy kisses: One candy goes in the center of every cookie to form the pointed crown of the witch hat.
- Halloween sprinkles: These add color and help define the decorated band around the base of each chocolate candy.
Because the chocolate begins setting soon after it is spread or dipped onto the cookie, it helps to unwrap all of the candy kisses before melting the chocolate.

Cooking Steps
STEP 1: Cover a flat counter or baking sheet with parchment paper. Arrange the 12 chocolate sandwich cookies in a single layer with a little space around each one. Unwrap the candy kisses and place the sprinkles nearby so you can decorate quickly.
STEP 2: Add the chocolate chips to a microwave-safe bowl. Heat them in short 30-second intervals, stirring carefully between each round. Continue only until the chocolate becomes smooth and fluid. Short heating intervals help prevent scorching.
STEP 3: Stir the melted chocolate thoroughly with a rubber spatula or spoon. Scrape the bottom and sides of the bowl so no unmelted pieces remain. If there are only a few small lumps, continue stirring before microwaving again, since the remaining heat may melt them.
STEP 4: Dip the top surface of one sandwich cookie into the melted chocolate. Lift it carefully and allow any heavy excess to drip back into the bowl before returning the cookie to the parchment with the chocolate-coated side facing upward.
STEP 5: Immediately press one unwrapped chocolate candy kiss into the center of the wet chocolate. Use gentle pressure so the candy adheres securely without forcing chocolate over the edges of the cookie.
STEP 6: While the coating is still soft, scatter Halloween sprinkles around the candy kiss. Concentrating them near the base of the candy creates the appearance of a colorful band around the witch hat.
STEP 7: Repeat the dipping, topping, and decorating process with the remaining cookies. Work one or two cookies at a time rather than coating all 12 first, since the chocolate needs to stay soft enough to hold the decorations.
STEP 8: Leave the finished witch hats undisturbed on the parchment until the chocolate has completely set. Once firm, carefully lift them from the paper and arrange them on a serving tray or transfer them to an airtight container.
Helpful Tips
- Set up before melting the chocolate. Unwrap the candy and open the sprinkles first so everything is ready while the coating is still fluid.
- Heat chocolate gradually. Thirty-second intervals with plenty of stirring are safer than one long microwave session and reduce the chance of scorched or grainy chocolate.
- Decorate immediately after dipping. The candy kiss and sprinkles stick most securely when added before the chocolate begins forming a firm surface.
Perfect Pairings
These Halloween cookies work especially well as part of a larger dessert spread rather than needing an elaborate accompaniment.
Hot chocolate is a natural choice for cooler Halloween evenings and continues the rich chocolate theme.
Vanilla ice cream provides a creamy contrast to the crisp sandwich cookies and makes the witch hats feel more like a plated dessert.
A Halloween snack board filled with fruit, cookies, popcorn, and other bite-sized treats lets the witch hats serve as the decorative centerpiece of a party table.
How do I keep the candy kisses from falling off?
Place each candy kiss onto the cookie immediately after coating it with melted chocolate. The chocolate acts like edible glue as it cools. Press the candy down lightly, then avoid moving the cookie until the coating has completely hardened.
Can I make these Halloween cookies ahead of time?
Yes. These cookies are well suited to advance preparation because there is no frosting or soft filling that needs last-minute attention. Make them a day or two before your event, let the chocolate set completely, and store them in a covered container until serving.
Why is my melted chocolate getting thick?
Chocolate can become thick if it is overheated or exposed to moisture. Microwave it only in short intervals and stir after each one. Make sure your bowl and utensils are completely dry, since even a small amount of water can affect melted chocolate.
Can kids help make witch hat cookies?
These are a good hands-on Halloween project for children once an adult has handled the hot melted chocolate. Kids can unwrap the candy kisses, arrange the cookies, add sprinkles, and help position the chocolate candies while the coating is still soft.
Do I have to dip the entire cookie?
No. Only the upper surface needs enough melted chocolate to secure the candy kiss and sprinkles. Coating one side keeps the process cleaner, uses less chocolate, and still gives each cookie the finished witch hat appearance.

How to Store & Reheat
Allow the chocolate coating to become completely firm before storing the cookies. If they are packed while the chocolate is still soft, neighboring cookies can stick together and the decorations may smear.
Place the finished witch hat cookies in an airtight container with parchment between layers if stacking is necessary. Keep them in a cool, dry place at room temperature for about 3 to 5 days. Avoid storing them near direct sunlight, a warm oven, or another heat source because the chocolate candies and coating can soften.
For longer storage, you can refrigerate them in a tightly sealed container for about one week. Let refrigerated cookies sit briefly at room temperature before serving for a better texture. Condensation can sometimes form on chilled chocolate, so keep the container closed while the cookies begin warming.
Freezing is possible for roughly one month, although the appearance of the chocolate and sprinkles may change slightly after thawing. Freeze the cookies in a well-sealed container with parchment between layers, then thaw them gradually in the closed container before opening it.
There is no need to reheat these cookies. They are meant to be served at room temperature, once the chocolate is firm and the sandwich cookie still has its familiar crisp bite.
With just four main ingredients and a simple assembly process, these witch hat cookies are an approachable Halloween project that still looks festive on a dessert table. The combination of crunchy chocolate cookies, smooth melted chocolate, candy kisses, and colorful sprinkles gives you plenty of Halloween character without complicated baking or decorating.
Oreo Witch Hat Cookies
Ingredients
- ½ cup chocolate chips melted until smooth in a microwave or over a double boiler
- 12 unwrapped chocolate candy kisses
- Halloween-themed sprinkles as needed
- 12 double-stuffed chocolate sandwich cookies preferably Double Stuf Oreos
Instructions
- Cover the counter or another flat work surface with a sheet of parchment paper.
- Set all 12 double-stuffed chocolate sandwich cookies on the parchment, leaving enough room between them for decorating.
- Unwrap the 12 chocolate candy kisses and keep them, along with the Halloween sprinkles, within easy reach for assembly.
- Heat the chocolate in 30-second intervals, stirring thoroughly after each interval, until completely melted and smooth. Avoid overheating the chocolate, as it can scorch easily.
- Dip one side of each chocolate sandwich cookie into the melted chocolate.
- Return each cookie to the parchment paper with the freshly coated surface facing upward.
- While the chocolate remains soft, firmly place one unwrapped chocolate candy kiss in the center of each cookie.
- Immediately scatter Halloween-themed sprinkles over the still-wet chocolate around the outer portion of the cookie.
- Continue the same process with the remaining cookies until all 12 witch hat cookies have been assembled.